Home › Forums › Explore Media › Oil Painting › How to photograph an oil painting ?
- This topic has 28 replies, 10 voices, and was last updated 10 years, 1 month ago by
 maryinasia.
-
AuthorPosts
-
February 28, 2014 at 10:40 am #991667
Hello dear fellow artists
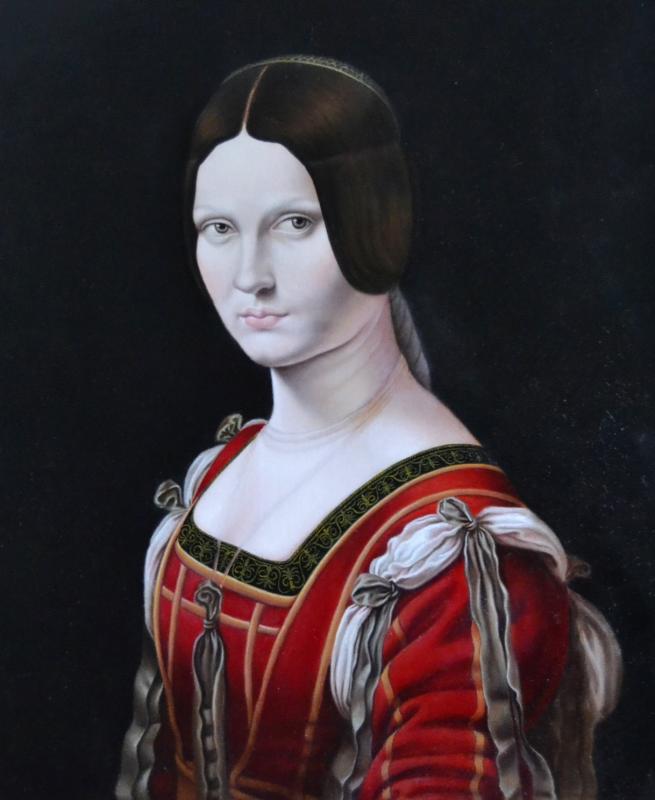
I have a big problem to photograph my oil paintings – not all of them, but figurative works , those which have dark backgrounds ( and not very dark ) and light flesh tones. For example this one: It is a copy after Leonardo Da Vinci “La Belle ferroniere” . It is not finished yet.
All the time when I am trying to take a good picture of this painting , the face and the flesh areas looks like a pale mask, while in reality the flesh has more vivid colors with forms, shadows and many tiny color nuances. Why it is happening ? I have a good camera , but not a professional – Nikon D 3100. I also have read some advises of the professional photographers how to take a perfect picture of the artworks, but those advises includes a professional (or so) equipment – lamps, very dark studio and etc, which I do not have. Is there anything I can do to improve the quality of the photos, that it will show more or less real colors of my paintings ? Any advises will be much appreciated.
February 28, 2014 at 11:04 am #1201056Your camera is fine for doing this. You don’t need special lights (though a pair of normal flashes does help).
First, I suggest finding a copy of Light Science and Magic; an introduction to photographic lighting. It provides excellent introduction to photographing artwork (among other things) and you should be able to borrow a copy from your local library.
With nothing more than a camera and a tripod you can get decent photos
1) Hang the artwork outside, but not in direct sunlight.
2) Position camera on tripod parallel to the artwork.
3) Use white card (poster board/foamcore) for reflectors on each side of the artwork, to ensure even illumination.
4) Place a grey card on the artwork and expose for that card. As an artist you can make a proper neutral grey using your eye and a picture of one of the cards from the link.
5) Use the exposure settings obtained from step 4, take three photos of your artwork. One at the exposure setting from step 4 and 2 that +/- 1 f-stop.With the three pics from step five and your camera’s desktop software you should have a good pic. If you are still having problems, a circular polarizing filter can help eliminate any glare you are seeing in the pics. Glare can be one of the reasons your lights are being washed out; however, try using your existing equipment with the steps above first to make sure the problem isn’t your photographing process.
"Man being born, as has been proved, with a title to perfect freedom, and an uncontrolled enjoyment of all the rights and privileges of the law of nature, equally with any other man, or number of men in the world, hath by nature a power, not only to preserve his property, that is, his life, liberty and estate, against the injuries and attempts of other men" ~ John Locke, [U]The Second Treatise of Civil Government[/U]
February 28, 2014 at 11:30 am #1201067Thank you very much , wandrson, for this advice. I didn’t know that it is possible to photograph the artwork outside. I am going to try your advice.
Is it possible to use this system indoors : studio or home ? Will it works ? The problem is that I live in Finland and in a winter time it can be really very cold outside
 !February 28, 2014 at 11:47 am #1201057
Yes, indoors is possible, but is complicated by the wide range of the colors of the various light sources. Which make getting accurate color in the photo problematic. That is why it is usually suggested that indoors work be done in dim conditions–doesn’t need to be dark, In this case the normal room lighting should be about 3 f-stops below the light sources used for photographing the art work.
If done indoors, I strongly suggest getting two of those cheap parabolic clip on flood lamps and place them at 45 degree angles to the artwork on either side.
The one problem with the above is the possibility of some glare with the more three dimensional nature of oil paintings. This can be eliminated by using polarizing filter material on the lamps as well as the camera lens.
The book I recommended has a great explanation of the hows and whys of a variety of setups, many of which don’t require much equipment and many more only require some relatively inpensive things (like the polarising material).
Overall, I have found shooting outside is the easiest (and cheapest) approach. The sun is a fantastic free light source.
"Man being born, as has been proved, with a title to perfect freedom, and an uncontrolled enjoyment of all the rights and privileges of the law of nature, equally with any other man, or number of men in the world, hath by nature a power, not only to preserve his property, that is, his life, liberty and estate, against the injuries and attempts of other men" ~ John Locke, [U]The Second Treatise of Civil Government[/U]
February 28, 2014 at 3:53 pm #1201055Cameras are incredible inventions – but not perfect. The biggest drawback of cameras compared to the human eye is they have a limited range when it comes to accurately portraying light to dark. So, if your camera is correctly exposing for the lightest areas, the dark areas will photograph much darker than they really are. If the dark areas are correctly exposed, the the lightest areas will be lighter and washed out. In the case of your painting, I would use the exposure that is accurate for the light/skin colored areas rather than the darker background – in portraits and figures those would be the most important.
If you set your camera to aperture priority (or similar name), you should be able to experiment with taking some pictures that are both over and underexposed. If the light areas are too light, try underexposing and see what happens.
The other element of taking photos of your artwork is manipulating them on your computer. If you have any type of photo editing software, you will probably need to manipulate the image – adjusting contrast, exposure and even colors. It is often a lot to learn, but, in my opinion, necessary. Almost every photo I take of my paintings is manipulated on the computer.
I agree with taking photos of artwork outside. It’s best on a cloudy day so that the blue of the sky does not influence the colors of the painting too much. If you have a large window or door where the light entering the room is very even, you might be able to take the photos inside.
That’s my opinion.
Don
February 28, 2014 at 4:08 pm #1201058Cameras are incredible inventions – but not perfect. The biggest drawback of cameras compared to the human eye is they have a limited range when it comes to accurately portraying light to dark. So, if your camera is correctly exposing for the lightest areas, the dark areas will photograph much darker than they really are. If the dark areas are correctly exposed, the the lightest areas will be lighter and washed out. In the case of your painting,
It is true that cameras have a limited dynamic range compared to the human eye; however, they have a much larger dynamic range than is available from paint. So it is quite easy to capture a painting with detail in the darkest areas as well as the lightest. ‘
The only real restriction is lighting and reflections causing glare. Since glare can be reduced by proper lighting placement that is a major component. Also, the brush strokes can be hidden or revealed with proper lighting placement. The general setup I suggested above works most of the time; however, for those situations where it doesn’t, knowledge is more important than equipment. That is why I suggested the book I did. It is well worth the cost for artists who photograph their own work.
It is also available electronically if you can’t find a local copy, apparently for free.
http://ken-gilbert.com/nsop/misc/photo%20books/Light.Science.and.Magic..pdf
If you read none of the rest of the book, then focus on Chapter 3!
I agree with taking photos of artwork outside. It’s best on a cloudy day so that the blue of the sky does not influence the colors of the painting too much. If you have a large window or door where the light entering the room is very even, you might be able to take the photos inside.
That is why I suggested the photo and artwork be kept out of direct sunlight. The north side of a wall or building is best. It provides a uniform light temperature, that allows for accurate color match in post processing.
Even better than the photo grey to determine exposure is to also use a color chart to allow for perfecting the colors in the photo. However, this is a task that requires skill with post processing software
The color charts are like this

http://chttp://www.bhphotovideo.com/bnh/controller/home?O=&sku=817209&Q=&is=REG&A=details"Man being born, as has been proved, with a title to perfect freedom, and an uncontrolled enjoyment of all the rights and privileges of the law of nature, equally with any other man, or number of men in the world, hath by nature a power, not only to preserve his property, that is, his life, liberty and estate, against the injuries and attempts of other men" ~ John Locke, [U]The Second Treatise of Civil Government[/U]
March 2, 2014 at 5:10 am #1201068Thank you , DAK723 and Wandrso, for the tips and explanations ! I’ll try all your advices. I am very interesting to see how it will goes outdoors, as I never tryed before. Only have to wait for a better weather :cat:.
March 2, 2014 at 6:49 am #1201074See if you have a “vivid” setting on your camera, or a “food” setting or similar. I found “vivid” on my Nikon D-70 after disliking the camera for the washed out, pale pictures it took for years, and it is much better now. (The manual was terrible to try to read.)
March 2, 2014 at 8:27 am #1201052The image below as a simple adjust of the white balance through software. Would it be more accurate?
 March 2, 2014 at 8:58 am #1201073
I think it would be helpful to tell us what settings on your camera you’re using, and what the lighting conditions are.
There’s a strange lack of color in your flesh tones. They look like a grisaille on my monitor. You say that this is a work in progress, but there should be more color information than is showing, so I’m puzzled by this.
My basic advice for photographing paintings is to stay away from any “auto” settings, like color temperature (white balance) or exposure. These can work well sometimes, but you want results that are repeatable. If your paintings have a large bias towards a particular color, an automatic setting will try to compensate for that, and the results may not be pleasant. As already mentioned, cameras can also be fooled by large areas of light or dark. This may have happened for this image- the very dark background may have caused the flesh tones to be overexposed.
You don’t need complicated setups to photograph paintings, and you can even shoot indoors. It can be as simple as using a typical diffused ceiling mounted light fixture. A white ceiling makes an excellent diffused light source. Place your artwork at about a 45 degree angle to the light source and mount your camera on a tripod or other firm surface. This is necessary to compensate for the slow shutter speed which would cause blur if you hand-held it. Most cameras have a self-timer, so you can also use that to avoid movement caused by pressing the shutter release. Use the “indoor” or “tungsten” setting on your camera, or else your pictures will come out very warm. Do all this at night, so as not to have light contamination coming from the outside.
It also helps to include a neutral grey strip just off to the side of your painting. This acts as a baseline for color correction in the computer. Stay away from high ISO settings. These are typically used for low-lighting conditions, but they can degrade the quality of your image, especially with lower-end cameras.
For the most control over the processing of your images, you can shoot in the “raw” mode. Here’s a link that explains it: http://www.dummies.com/how-to/content/choosing-the-raw-image-format-for-a-nikon-dslr.html
Here’s a sample:Greater creative control: With JPEG, internal camera software tweaks your images, adjusting color, exposure, and sharpness as needed to produce the results that Nikon believes its customers prefer. With Raw, the camera simply records the original, unprocessed image data. The photographer then copies the image file to the computer and uses special software known as a Raw converter to produce the actual image, making decisions about color, exposure, and so on at that point. The upshot is that “shooting Raw” enables you, not the camera, to have the final say on the visual characteristics of your image.

"A bold failure is better than a timid semi-success." John Howard Sanden
March 2, 2014 at 1:24 pm #1201066Nathalie a most beautiful study …the clothing is splendid
Dave … Great advice , thankyou for sharing that ….I for one appreciate reading all this , photographing ones work is the pits …:)
March 2, 2014 at 3:56 pm #12010541) Hang the artwork outside, but not in direct sunlight.
In my experience, this is the main thing. Bright, indirect outdoor sunlight, away from any surface that might reflect on the painting. IMHO, a day that is evenly overcast but bright is best.
Lamar
Art is life's dream interpretation.
- Otto RankMarch 3, 2014 at 5:25 pm #1201047I use Xrite and ColorMunki to calibrate my screen; I am never really happy with the end result (link)
I used a Sony a700 DSLR + 2.8F 30-70 lens, the ambient light were I paint is always 2700K. My LCD screen is a fairly high end 30” that I have specifically got for its ability to display a good color range (well I guess it’s okay as far as screens go).
I set my camera to preset mode where I have white balance set to 2700K and manual focus. I would take a shot with Auto Focus and one just using my eye. I sometimes take an extra shot with the Xrite color swatch, for tuning.
My lighting it’s at 45 degrees to canvas, guaranteeing no glare on photo or while I paint. Unless you have raised paint, in that case cast shadow maybe what you want.
I import the image into PhotoShop, I often tune the vibrancy up a bit (despite above).
I often narrow the dark end of the spectrum. I use the curves setting in PS (same place you can play around with white balance). I often find blacks in photo to light … this brings it back closer to my intended black without messing with the mid/high range. I seldom mess with light side of the curves setting since making light values to white can lead to clipping off details. PS allows you to see clipping of darks or white as you play with the curves.
Despite my best effect I always loose details, especially in very layered work. Fine/soft flesh details will simply be gone from the image. Most people can’t tell, but I know as I had painted it.
So even after this this rigmarole I nearly always hate the photo version, I can nearly always tell the hue/value/saturation and even focus is off. All very subtle, but off :o Very frustrating.
Tuning always seems to be a trade off, I tune one value up and loose something else.
Hope this helps.
“A portrait is a likeness about which there is something wrong with the mouth” - John Singer Sargent[/I]
March 3, 2014 at 5:50 pm #1201059My lighting it’s at 45 degrees to canvas, guaranteeing no glare on photo or while I paint. Unless you have raised paint, in that case cast shadow maybe what you want.
Three things, the distance of the light from the canvas is important if you have only one light. With shorter distances, there can be a significant difference in the light levels on one side of the canvas versus the other. This is why the source I mentioned suggested two light sources, one on either side.
Also, even with the proper angle, you can get glare, that will reduce the level of detail you are seeing in either the dark or the light (or both) areas. Film/digital cameras have a wider dynamic range than paint. So if you see detail on the canvas that you are not seeing on the digital image, then you have a glare problem. And in that case, assuming you have done two lights at about 45 degrees, you need to put polarizing filters on both the lights and the lens. That will eliminate the glare and maximize the detail you capture. Even if painting thing, oil paint in particular, has texture (different angles and heights) then compound that with transparent pigments that allow light through the paint layers and therefore have a little glare, just like glass.
Finally, while knowing the color temperature of your lights, assuming they are bright enough to illuminate at least three f-stops above the background lighting helps. Taking the first pic with a known color chart and color correcting in post processing is the only way to guarantee an accurate color match. Not usually necessary, since you can’t guarantee that the end user’s monitor is color correct (the vast majority are not)…
"Man being born, as has been proved, with a title to perfect freedom, and an uncontrolled enjoyment of all the rights and privileges of the law of nature, equally with any other man, or number of men in the world, hath by nature a power, not only to preserve his property, that is, his life, liberty and estate, against the injuries and attempts of other men" ~ John Locke, [U]The Second Treatise of Civil Government[/U]
March 4, 2014 at 11:17 am #1201069Thank you everybody for the answers ! it is a great help !
Toril, Dave Johnson : I have to check my settings, but if I remember right , it is not automatic , because I was adjusting the settings following some instructions I found in Internet and “The Artist’s Magazine”. The day was grey and cloudy, but I have a large windows and I didn’t use any additional lights for photographing this painting.
It is not a grisaille, Dave Johnson, but it really looks like, as you mentioned. In reality the flesh tone has more color. Actually, I took this photo after a fresh glaze of color was applied over the shade areas, but on the picture it is not visible at all ! That’s why I am posted this question here.
-
AuthorPosts
- The topic ‘How to photograph an oil painting ?’ is closed to new replies.
Register For This Site
A password will be e-mailed to you.
Search