Home › Forums › Explore Media › Oil Painting › easy color chart – example Zorn limited palette
- This topic has 15 replies, 6 voices, and was last updated 20 years, 5 months ago by
 Jinx.Garza.
-
AuthorPosts
-
November 18, 2003 at 7:11 pm #983748
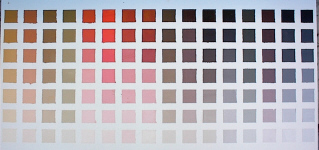
After reading Matt V’s thread on Zorn’s limited palette https://www.wetcanvas.com/forums/showthread.php?s=&threadid=72284 I was wondering what the range on color would be so I decided to make a color chart and find out. I don’t have vermillion, so I used carmium red light instead and I don’t have lead white, so I used titanium white. I also used yellow ochre, ivory black, and burnt umber.
Here is what I came up with:

This color scheme is simpler than it sounds described by words, but I will do my best to describe it.
The first four columns are based on yellow ochre, the second set of four columns are based on cadmium red light, the third set of four columns are based on burnt umber, and the last set of four columns are based on ivory black.
The columns in each set contain the color the set is based on plus, from left to right of page, yellow ochre, cadmium red light, burnt umber, ivory black. So of course, if a set is based on a color and you add the same color, you have just the base color still.So the first column has pure yellow ochre at the top and it is lightened progressively by adding white to it as you go down the column. The second column has yellow ochre + cadmium red light (favoring yellow ochre) at the top, and the mix is progressively lightened by adding white as you go down the column, and so on.
The colors used at the top of each column are as follows
col# main color minor mixed in color
1 yellow ochre (yellow ochre)
2 yellow ochre cadmium red light
3 yellow ochre burnt umber
4 yellow ochre ivory black
5 cadmium red light yellow ochre
6 cadmium red light (cadmium red light)
7 cadmium red light burnt umber
8 cadmium red light ivory black
9 burnt umber yellow ochre
10 burnt umber cadmium red light
11 burnt umber (burnt umber)
12 burnt umber ivory black
13 ivory black yellow ochre
14 ivory black cadmium red light
15 ivory black burnt umber
16 ivory black (ivory black)I hope that isn’t confusing.
And here is how I did it, for those of you that are interested in an easy way to make color charts:
(BTY – this is a modification of the way I learned to make color charts in the book “Oil Painting for the Serious Beginner” by Steve Allrich)
First, to make this chart you will need a piece of canvas board 12″ x 24″, 1/2″ wide masking tape, a ruler or better yet a grid, a palette knife, and 5 colors of paint including white.
Here’s my stuff I used:

The grid is great because you can position your canvas board on it and use the grid marks as guides to locate the tape and you don’t have to do any measuring or drawing.

Anyway, one way or another you need to get tape on the canvas. Along the narrow edge of the canvas start by covering 1/4″ of the edge of the canvas, then go all across the canvas making each space 1″ wide. You will end up covering another 1/4″ at the opposite edge. Now, along the long edge, leave 1/2″ uncovered and put the tape across right next to that uncovered 1/2″. Go across and make 1″ squares now and you should end up with the same size border on the other side.
Start with yellow ochre. Use your palette knife to smear it on the first square, then mix it with various quantities of white and fill in the other squares below it so each one gets lighter. I actually do my lightest square right after the pure square and mix the two to get all the others. The first column looks something like this:

Now, for the second column, start by mixing yellow ochre with cadmium red light, and make a mixture that looks more like yellow ochre than cadmium red light. You will make a mixture of yellow ochre and cadmium red light that looks more like the red later. Now spread your mix in the top square and mix white in to make the paint for the other squares like you did for the pure yellow ochre.
The third column will be a mixture of yellow ochre and burnt umber and the fourth column will be a mixture of yellow ochre and ivory black. But since I already have yellow ochre and cadmium red light on my palette, I am going to skip ahead and do the fifth column now, which is a mixture of cadmium red light and yellow ochre, with the mixture looking more like cadmium red light than yellow ochre this time.
After the fifth column is done I go back and do the third column, yellow ochre and burnt umber. When this column is done, you guessed it, I do the 9th column, which uses burnt umber and yellow ochre.
At this point here is what I have:

I continue in this manner until the whole chart is filled in, then carefully remove the tape and let it dry.
It took me about 3 hours to make this chart, including time to take pictures and give minimal attention to my two-year old, who I am grateful to for happily playing in his room by himself while I did this. I am also a pretty slow painter though and had to do a lot of adjusting.
Hope this helps anyone,
TamNovember 18, 2003 at 7:22 pm #1019297MANY THANKS, TAMMAY!!
It really is very kind of you to put out all this work and then share with us, here.. this is the kind of effort that makes this THE place to be on line.
"I would paint something and be satisfied with it for a period of time and then, foolishly, I would go into it again and destroy it. That became so painful that I stopped painting for about five years. I’d get to a place, maybe an ecstatic moment, or maybe not that good, but somehow it was concluded... Why go and mess with it? But the idea would come to go back into it, assuming that the more times I’d go back into it, the better it’d get. Well, it’s just the reverse!! It doesn’t work that way. It’s a gift. It’s kind of given to you" -Nathan Oliveira
November 18, 2003 at 7:22 pm #1019300Great work Tam, and such a devotion to your colors!
Now look everyone, what an enormous width and range you get with those few tubes. And this is not all of them by far!
Thanks for showing this to us!
Now do us a favor and get some large images of this!!!! Please!!!!
//matt
Skill of hand can never make up for emptiness of heart
_____________________
http://www.sammekull.seNovember 18, 2003 at 7:40 pm #1019304You guys are very welocome!
[i]Originally posted by Matt V [/i]
[B]Now do us a favor and get some large images of this!!!! Please!!!![/B]I would be happy to but the uploader message says that the limit is 100K and I haven’t figured out how yet. If you can tell me how to get a bigger picture to you guys I will. The file I have from my camera is 1385.42 KB at 150 pixels per inch and it says it will make an image that is 3.11″ x 6.61″.
Heres one with a smaller resolution:
still not any bigger??????
I’ll try attaching something…
Tam
November 18, 2003 at 7:48 pm #1019305OK, I wouldn’t call that large, but it is a little bigger. I’ll try to attach the full picture and see what happens….. Didn’t work.
I have to make it no bigger than 500 x 600.
Here we go….
November 19, 2003 at 2:10 am #1019301You could get it even bigger if you flip your image clockwise on step, so you could use the maximum height of 600 pixels.
//matt
Skill of hand can never make up for emptiness of heart
_____________________
http://www.sammekull.seNovember 19, 2003 at 5:38 am #1019303Hi Tammy Marie, Matt V
I copied the first little palet last night and put it in correl painter classic to experiment with it; now that i have the bigger palet it will be even more practical, thanks for suggesting that Mat V.
So i made a virtual oilsketch with it, to my standards not a bad start;i would like to propose, if anyone is interested to share the historyrecordings wich come in form of movies, maybe stills of different fases; believe this would be a great learning experiance. Thanks again for the superbe example of this colourchart
November 19, 2003 at 11:40 am #1019298forgive me for pointing out the obvious but the glare on the photo is ruining the colors….it must be evenly lite and make sure that you are saving it as a .jpg image… Since, you like to share your discoveries, we are more than glad to help you do it..:angel:
There is light bouncing back into the camera lens…make the surrounding background black or be careful of your light source.. it is bouncing into the lens like a basketball rebound..do NOT use flash when photographing this nor any type of art."I would paint something and be satisfied with it for a period of time and then, foolishly, I would go into it again and destroy it. That became so painful that I stopped painting for about five years. I’d get to a place, maybe an ecstatic moment, or maybe not that good, but somehow it was concluded... Why go and mess with it? But the idea would come to go back into it, assuming that the more times I’d go back into it, the better it’d get. Well, it’s just the reverse!! It doesn’t work that way. It’s a gift. It’s kind of given to you" -Nathan Oliveira
November 19, 2003 at 12:04 pm #1019299I am grateful for your through walk through of your color chart making…..this is something I have wanted to do and you have shown a simple way to do this….thanks for all your hard work to share this process!!

Cathleen~
[FONT=Times New Roman]~Be COURAGEOUS, It's one of the few places left still uncrowded~

[FONT=Times New Roman]~Life is not measured by it's length BUT by it's depth~
November 19, 2003 at 2:36 pm #1019306[i]Originally posted by artbabe21 [/i]
[B]….thanks for all your hard work to share this process!! [/B]Cathleen, you are welcome and I love your new picture! I didn’t know who it was at first. Is that you as a little girl? Absolutely darling!
[i]Originally posted by Matt V [/i]
[B]You could get it even bigger if you flip your image clockwise on step, so you could use the maximum height of 600 pixels.//matt [/B]
Good idea Matt, I should have thought of that yesterday. I’m actually going to try to cut it into the four sections and post it as 4 different pictures.
[i]Originally posted by Mario [/i]
[B]There is light bouncing back into the camera lens…make the surrounding background black or be careful of your light source.. it is bouncing into the lens like a basketball rebound..do NOT use flash when photographing this nor any type of art. [/B]Good suggestions! The photo shown was taken outside in late afternoon without a flash. The chart was laid flat on the ground to avoid glare as best I could. If you have a suggestion for a better setup let me know and I’ll give it a try for you. Actually, when the paint dries I will be able to lay it right on the scanner, that might work better.
It does actually look pretty close to the real chart though. The values on the bottom three rows are very washed out, on purpose, as I will be using those for skin tones. I usually only use 5 value steps on color charts but wanted 7 steps on this one just to get the extra three very light ones at the bottom.
Here is the first section:
November 19, 2003 at 2:38 pm #1019307And the second section:
November 19, 2003 at 2:40 pm #1019308And the third:
November 19, 2003 at 2:43 pm #1019309And finally, the last one:
November 19, 2003 at 3:15 pm #1019310I put the big picture in the RIL. I hope that is OK. I’m sure it will be used for reference!! LOL. I didn’t know where to put it so I put it under Z for Zorn, where it can be found pretty quickly. (Oops! That’s the museum! I didn’t realize that when I put it in there, maybe someone should move that out of there!)
Anyway, the full-sized image more than fills up my computer screen and is a pretty good representation of the colors but if anyone wants me to try to take the photo again under different conditions, let me know what to do and I’ll give it a try if I can.
Tam
November 19, 2003 at 3:31 pm #1019302thanks tammy marie
this is exactly what i was looking for to plan out a huge painting with 13 figures in it
wondering how the heck i was going to limit my palette with so much going on.
check it out via the composition forum?
https://www.wetcanvas.com/forums/showthread.php?s=&threadid=146445
would love some feed back on this – got a little, but maybe i should post it here – what do you think?
this was a great start tho – i am starting to fly now.
you are a gem
biki
"Art is an act of love in likeness of itself - Spirit moulding matter into lovely form:"
"His act in us for Him."
Francis Brabazon - Australian Poet.
-
AuthorPosts
- The topic ‘easy color chart – example Zorn limited palette’ is closed to new replies.
Register For This Site
A password will be e-mailed to you.
Search