Home › Forums › Explore Media › Drawing and Sketching › Tips and Tricks – Drawing and Sketching › Pencil Embossing Wip
- This topic has 12 replies, 9 voices, and was last updated 13 years, 1 month ago by
 Einion.
-
AuthorPosts
-
April 18, 2008 at 10:07 pm #987092I think it adds something special to decorative pencil art. It almost looks like silver engraving and can be used in many styles of subject matter.
simple line enhancement

or more elaborate work such as florals

Here is a materials list and a hopefully simple demonstration
of the process4 sheets of paper:
1 sheet called “the padding” this can be any scrap paper.
1 sheet called “the recepter” this should be good quality drawing paper.
1 sheet called “the embosser” common computer stock will do.
1 sheet called “the shield” common computer stock will do.The padding sheet allows for a measure of softness to make sure the embossing is deep enough to respond to your work.
The recepter sheet is the sheet that will actually recieve the embossing and be your finished piece of art.
The embosser sheet is the work sheet that transfers itself to the recepter sheet.
The shield sheet is just for the purpose of laying over your art while you do it so as to keep it clean and smudge free.Have a good hard surface, so as to be able to get good darks with your pencil work. You cannot usually get good darks working in a book format. A drawing board is fine but it must be large enough for you to lay your hand/arm on it so as to control your work.
Stack your three sheets of paper. Padding sheet on the bottom, recepter sheet in the middle and the embosser sheet on top. paper clip them maybe so as to hold them together.
On the embosser sheet BEFORE YOU STACK IT make your drawing, in as much or as little detail as you would like. Just make sure that the lines are all of them acceptable to you. Once embossed they cannot be changed.
Now place the embosser sheet over your recepter sheet and taking a ballpoint pen ( I prefere because it makes a smooth line of even width easily) but you can use a hard lead pencil. Carefully and smoothly draw over your sketch, putting some pressure on your pen, but not overkill, it doesn’t take much.
When you have finished remove your embosser sheet and your padding and set them aside. You are ready to work on what looks like a blank sheet of paper! I like a 2b pencil. Sharpen a hand full of them, very sharp with long narrow points. This should be done with the side of the lead to create light to dark values. I personally do not like cross hatching but there is extensive use of line drawing. I say sharpen a lot of them because I hate to be interrupted in my flow of creativity to stop and sharpen a pencil. keep those points sharp!Here are initial images resulting from the above descibed procedure

this is my original drawing on the embosser sheet. You can make it simple or elaborate as needed.

Here you can see how I went over my original drawing on the embosser sheet with the ball point pen. You can make changes at this stage, there are differences in this image from the original sketch. Once this embossment is done however, you are commited to what you have drawn.
[/LEFT]

this is very light, that is good,it should not be so dark as to interefere with your drawing needs, just dark enough to see where the white lines are.
this is where I am on this at the moment…I will post progress as I finish it. If anyone has questions I will help if I can.
[/CENTER]
[/LEFT]
[/CENTER]
[/LEFT]
[/CENTER]just paint the light... ...the form appears!
April 19, 2008 at 6:55 am #1100489
...the form appears!
April 19, 2008 at 6:55 am #1100489Excellent Demonstration Corby!:clap:

I’m off to find the materials and pencils now!:wink2:
[FONT="Tahoma"]Regards, Deirdre (Always pleased to get C&Cs!) Don't forget - comment on other threads in the forum as well as posting your own work - also, we encourage you to post WIPs, they help others to learn as well as you.
 Moderator[/COLOR] [April 19, 2008 at 4:08 pm #1100493
Thank you Dee!
I have done a little more on this. It is an imaginary piece. This is always a nice change from having to depict a certain degree of realism: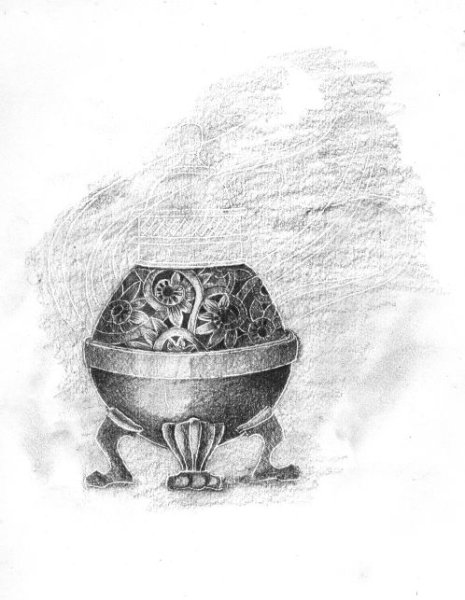
It might be noted that in my imaginary Passion flower design I got rather wonky with one of the flower centers. This will look better as the drawing progresses and it begins to relate to everything else. The lesson being I guess, that imperfections in process do not necessarily ruin what we are doing.
just paint the light......the form appears!
April 19, 2008 at 4:18 pm #1100490Corby…this is a bit magical…such beauty appearing from the mist!
[FONT="Tahoma"]Regards, Deirdre (Always pleased to get C&Cs!) Don't forget - comment on other threads in the forum as well as posting your own work - also, we encourage you to post WIPs, they help others to learn as well as you.
Moderator[/COLOR] [April 20, 2008 at 7:20 pm #1100494The next stage: I have finished the top of the burner. For no particular reason I worked backward from what I usually do. It makes sense to work from the top down. It just seems more orderly and makes for lest chance of smudging or abrading work already done.

At this point it is just a matter of drawing the smoke and rendering the background to what ever degree and in what ever manner you like:

Is he DONE yet? I dunno, do you THINK he’s done? I dunno, do YOU think he’s done? He MUST be done!!! C’mon lets go and emboss some apples!
 Enjoy friends!just paint the light......the form appears!
April 20, 2008 at 8:01 pm #1100491
Enjoy friends!just paint the light......the form appears!
April 20, 2008 at 8:01 pm #1100491Ouch!
I didn’t think it would be hot Corby!! But it sure is smokin’! Wonderful demo….more please MORE!!:D[FONT="Tahoma"]Regards, Deirdre (Always pleased to get C&Cs!) Don't forget - comment on other threads in the forum as well as posting your own work - also, we encourage you to post WIPs, they help others to learn as well as you.
Moderator[/COLOR] [March 6, 2009 at 12:54 pm #1100496Wow, I am glad that I came upon this-thank you so much for posting it-beautiful:)
Note to self: Get your butt away from computer-pick up pencil and draw!:eek:
March 13, 2009 at 2:57 am #1100499I’ve practiced this teechnique by accident in the past–Awesome art man!
“At the age of six I wanted to be a cook. At seven I wanted to be Napoleon. And my ambition has been growing steadily ever since.”
― Salvador Dalí
http://gregsmind.deviantart.com/March 19, 2009 at 2:02 am #1100495What a neat idea Corby, I too, have had lines where I didn’t necessarily want them, so I guess I can say I understand this principle.
PaintNCurly (Kaye)
C&C always welcome
Paint before all else! Idle hands, idle mind!
 March 19, 2009 at 4:55 pm #1100498
This is amazing and thank you so much for showing it to us other WC members!!!!!
Xandra
"To wish is to waste, to dream is to design, to do is creation of the dream!"March 20, 2009 at 12:26 am #1100492I really like this idea. I have only just started doing graphite and this is a great way for me to have a go at this medium. Thanks for the WIP Corby.
Cherylyn


 March 1, 2011 at 4:24 pm #1100497
wow its cool
:grouphug:
March 1, 2011 at 5:37 pm #1100500I have rated this thread as excellent! It looks very much like scratchboard but done in such a way that we can all afford to try it. Thanks so much!
Sandy -
AuthorPosts
- The topic ‘Pencil Embossing Wip’ is closed to new replies.
Register For This Site
A password will be e-mailed to you.
Search