Home › Forums › Explore Media › Pen and Ink › Pen and Ink Help Desk › Foliage Tutorial – Part 1
- This topic has 102 replies, 43 voices, and was last updated 9 years, 3 months ago by
 jo_b.
jo_b.
-
AuthorPosts
-
October 22, 2005 at 3:43 am #985293
Drawing Foliage in Ink
using the “Scrtibple” techniquePart 1
_____________________Welcome to the first part of my foliage tutorial series. I will do my best to explain the process and methods I use to create the foliage in my drawings. I use a technique which has become known as “scrtibple” (a term coined by Mel-ink) which is simply a combination of “scribble” and “stipple”. For those of you who aren’t familiar with my work, I’d like to begin by showing you a few examples of my foliage that I cropped from several of my drawings. This will give you some insight as to what you can expect from this series.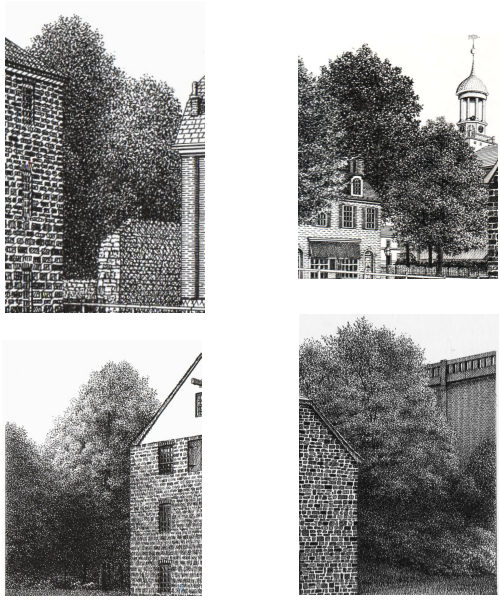
Important: There is one basic rule that I adhere to when doing my foliage.. Don’t Rush!
I use multiple layers which allows me to add ink little by little, resulting in a more consistant texture. Think of it as housepaint; one thick coat takes less time, but doesn’t look as good as three lighter coats applied over each other.Materials
_____________________
I used a “00” (.30) Koh-i-noor Rapidograph pen on hot press illustration board.
Techniques_____________________
I use a combination of the following techniques.[/CENTER]
Continuous Scribble – This is a basic scribble done using a single continuous line, without lifting your pen.
Stipple – I don’t use this as a stand-alone method, but I apply it as an additional layer on top of existing scribble textures or as a “blending tool”. As you can see, my example is not a “true” stipple, as I tend to inadvertantly add an occasional line segment, disrupting the smooth flow of dots. For my purposes this is fine, but most stipplers will confirm that this is, in most cases, a fatal error to a drawing done in pure stipple.
Broken Scribble – This my “secret ingredient” for achieving the softness to my foliage. As a self-taught artist, I don’t know if “broken scribble” is an industry method that’s taught or practiced. I simply stumbled upon it during the natural evolution of my experience. This technique is similar to a continuous scribble, only the pen is lifted off the paper in the same manner stipple is created. The pen skips and jumps back and forth, and in little scribble motions. The hand motion is almost the same as drawing a five-pointed star, only you lift your pen after each line and move your hand along the paper, adding random squiggles and arcs. I use this method almost exclusively as it provides more control in applying the desired texture without over-working an area.

Drawing a Basic Bush
_____________________Before we get into drawing trees, I thought it would be best to start with something simple to introduce you to my method. I spent many years doing architectural renderings of homes that had “trimmed” or “sculpted” bushes, and they seemed like the perfect candidate for this demonstration. The techniques used to draw this bush are the same techniques I use to create the more advanced trees, which will come later on. And since this is more of an exercise to prepare you for using these methods to draw trees, I did not use a reference photo. So, without further ado, here is how I go about creating a landscaped evergreen bush._______________________
Using a pencil sketch as a guide, I first ink a basic outline.
_______________________
Once I have my outline inked,
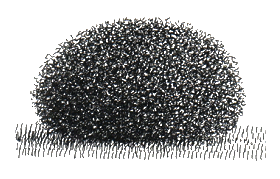
I use a broken scribble to fill the entire area of the bush.
The reason I don’t move straight across is to avoid a horizontal pattern
and provide a natural look more closely assimilated to the random texture of the bush._______________________

I continue until I have a fairly even layer of scribble covering the entire surface.
_______________________
I then add the second layer.
I started here with a few bold scribbles at the bottom to create a sense of darkness under the bush.
I apply the second layer similar to the first one, again, working my way up towards the light source.
Here is a close-up of the left image above to better show you the difference between the two layers:

When I apply one layer on top of another,
I try to run my lines “through” the white spaces that were created by the loops of the first layer,
almost as if I were dividing the white areas into smaller ones._______________________

As I complete the second layer, I convert to using stipple as I move towards
the top in order to keep it lighter (due to the light source)._______________________
The third layer

_______________________
The fourth and final layer is added to further enhance the darks, and to add more texture.

_______________________
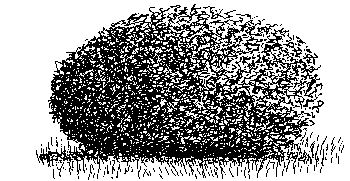
With the final layer complete, I add some grass and some shadows.
And we have our bush.
_______________________This bush only takes a matter of 10 – 20 minutes to draw.. I encourage you to give this a try and post your attempts. Also, I’ll be happy to answer any questions you may have.
Continue to – Part 2 – Drawing Multiple BushesDave........."My pursuit of perfection is not intended to lead me to perfection, but to simply get me as far away as possible from imperfection."

My Website[/URL]..........How to Produce (and Sell) Prints of your Artwork..........My Foliage TutorialsOctober 22, 2005 at 4:06 am #1059905Dave,
Excellent tutorial! I’ve been waiting for this. I’ll try and do a bush tomorrow morning and post it…..this is very cool and thanks for sharing!
RonOctober 22, 2005 at 5:27 am #1059942Excellent tutorial! Thank you for taking the time and trouble to explain your technique so clearly. I’ll certainly give this a try.
Dave
 October 22, 2005 at 6:02 am #1059906
Hi Dave,
OK….I couldn’t wait to get yelled at by a Master! Pardon the grass. Maybe that’s the next tutorial?
Ron
 October 22, 2005 at 9:45 am #1059916
Excellent! Thanks, Dave!
New Users: Beginner's Guide to WetCanvas! ***How to Post Images *** How to Edit Your Profile *** How to Search the Forums *** Guide to the Forums *** Learn about the Virtual Gallery Manager
October 22, 2005 at 10:27 am #1059983Dave – Thanks for the instruction. Very well done. This thread’s a keeper! Can’t wait to get some practice in.
Marc
"The mind, once stretched by a new idea, never regains its original dimensions." Oliver Wendell Holmes
October 22, 2005 at 10:51 am #1059943Here’s my attempt. In defence of my grass, I should say that you’d understand if you could see my lawn!
Dave
October 22, 2005 at 11:37 am #1059904Dave, this is an excellent tutorial. I am glad that you decided to do it here in the forum intstead of with the publisher.
REMEMBER TO RATE THIS THREAD!
Ah, make the most of what we yet may spend, before we too into the dust descend.... Omar Khayyam


Stone Chief Studio_____________________________
CharissaOctober 22, 2005 at 2:17 pm #1059949You are all very welcome! I’m sorry to keep you all waiting so long for this.. but I did try to at least make it worth the wait.
Ron – Outstanding! That’s a great bush! … and your grass isn’t so bad! (I’ll make a cross-hatcher out of you yet! – lol) You really handled the outer edges of the bush very well. Do you see the dark area going up through the middle?.. I’d like to see a smoother blend there. Of course, that’s not necessarily a mistake, as that’s how bushes tend to be. The reason I’d like to see a more gradual blend is not so much to make a perfect bush, but to show perfect control!
 This is where your stipple experience comes in.. just add dots or small hashes one by one to the “little white spaces”
Dave (mothsailor) – This is also a great job! You maintained a really nice gradual shading throughout the bush… well done! I do want to point out that your outer edges are a bit smooth.. bushes have little “bush extremities” that stick out.
Everyone, Keep in mind that this “bush exercise” is kinda like “wax on.. wax off”.. you’ll be using what you practice here later on when we create those full grown, lush trees!
Marc – Thanks for the kudos! I certainly hope you join us in our foliage exploration!
Monica – Thanks for helping me with this.. the idea to do a thread instead of an article was awesome! This’ll be alot more interactive and alot more fun!
Charissa – Thank you!!!

Dave........."My pursuit of perfection is not intended to lead me to perfection, but to simply get me as far away as possible from imperfection."
My Website[/URL]..........How to Produce (and Sell) Prints of your Artwork..........My Foliage TutorialsOctober 22, 2005 at 2:30 pm #1059913You gotta write a book, my friend!!! Thanks for this tutorial, it’s obviously taken a lot of work on your part scanning and writing the text etc, etc,. What a lucky bunch we are to get this kind of instruction!!! When my “TO DO RIGHT NOW OR ELSE!!!” pile gets more manageable, I have to give this a try. Long live the scrtibple king!!!!
mel
my websiteOctober 22, 2005 at 3:09 pm #1059947Going to have a go at this later today.
Super tutorial Dave!
Anita
Blog
Photo a Day Blog
www.anitamurphyart.com[/COLOR]October 22, 2005 at 3:36 pm #1059948Hi,
great tutorial.
If you don’t mind I’ll post this into a thread called October Links at the pastel talk forum since this technique can also be applied to pastel pencils.
Of course that the credit will be given to you.Regards,
José
I'm not lazy because I sleep until late. I just dream alot.
October 22, 2005 at 4:06 pm #1059950Mel – I know, I know… a book. Of course, we all have our “TO DO RIGHT NOW OR ELSE!!!” lists. And I appreciate the acknowledgement on the time it took to do this. It was like a drawing.. quite awesome watching it come to life! btw – I bet you had no idea that your fun term “scrtipble” would become the essence of my instruction.. thanks bunches for that!
Anita – Thank you.. I do hope you join in on the fun!
José – Absolutely… spread the love! If you feel this is applicable to pastel.. please feel free to link to it. The more folks who benefit from it.. the better!
Dave........."My pursuit of perfection is not intended to lead me to perfection, but to simply get me as far away as possible from imperfection."
My Website[/URL]..........How to Produce (and Sell) Prints of your Artwork..........My Foliage TutorialsOctober 22, 2005 at 9:47 pm #1059910A well written and illustrated tutorial Dave!!
…….and we have a 5 Star rating already!! AWESOME!!
look forward to your next installment! Murray
———————–
[Quote]*I am "drawn" to Art!!* ~artdude~[/Quote]
October 23, 2005 at 2:32 am #1059907Dave,
I totally agree with Murray….you’ve done a great job on your tutorial. I think I can do the blending ok. Waiting in earnest for Part 2 (another Hollywood Sequel)!
( good job!! Mothsailor Dave)
Ron -
AuthorPosts

- The topic ‘Foliage Tutorial – Part 1’ is closed to new replies.
Register For This Site
A password will be e-mailed to you.
Search