Home › Forums › Explore Subjects › Marine Art › I would appreciate some advice on wave painting in oil…
- This topic has 27 replies, 8 voices, and was last updated 7 years, 3 months ago by
 Gigalot.
-
AuthorPosts
-
October 14, 2016 at 7:00 pm #994488
I’m pretty new to oil painting and I’m trying to learn how to paint seascapes.
The thing I’m having trouble with is painting waves and chops on open sea or in the swells between and on the face of waves.
I’ve been copying an E John Robinson picture from one of his books and can’t seem to get to grips with the chops on the distant waves. Here’s an example of my first attempt.

And here’s a second attempt where I over painted the sea and tried again (made it worse)

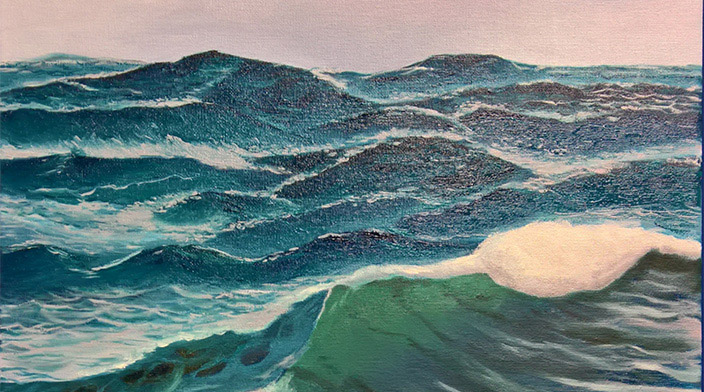
Some aspects of the first attempt I was happy with, but I couldn’t get the overall effect. This was done with the underpainting still wet using a fine sable round brush to lay on the chops (as recommended by E John in his videos). I ended up dabbing all kinds of disconnected blobs for waves which is why (I think) I lost control of things.
The second attempt I went way off track, to be honest I feel here that I got the underpainting wrong and then made a mess of the chops on top of that.
At the moment I’m letting the thing completely dry while I practice doing waves and chops on cheap bits of board.
I’d appreciate any tips and advice you could give me on how to paint the chops on the waves in oil.
Do you paint the chops onto wet underpaint or let it dry first?
Do you start with dark chops and then work towards highlights?
Do you thin the paint for the chops with medium?
Sorry for so many questions.
October 15, 2016 at 2:46 am #1258859There is a lady (Wine Country) from the Origan Coast who was posting on the Plein Air forum, she painted the ocean from her beach, at one time on a daily bases.
She became very good as she understood the water and was able to respond to it. It was her interpretation of something she loved that took her work above the ordinary.Without this personal involvement and response it’s just copying and will not be saying very much about the subject.
Dave.“What peaches and what penumbras! Whole families shopping at night! Aisles full of husbands! Wives in the avocados, babies in the tomatoes!—and you, Garcia Lorca, what were you doing down by the watermelons?”
— Allen Ginsberg
Are you ready for a Journey?
PS Critiques always welcome but no plaudits or emoting, please don’t press the like button.October 15, 2016 at 6:19 am #1258860just keep painting. you are off to a good start.
don’t paint over or destroy your attempts, as it erases your chance to learn, and, of course, to see your progress.
e.john’s books and videos are very good. as are byron pickering’s, and those of several other author/artists.
copying is the time-honored, traditional way of learning.
patience and practice.
"Beauty is nothing but the beginning of terror, which we still are just able to endure, and we are are so awed because it serenely disdains to annihilate us." -- Ranier Maria Rilke
October 15, 2016 at 12:23 pm #1258866Can only agree with the above. I use watercolour and the sea is usually secondary to the mains subjects the ships. It usually works enough for me. Might be different if the sea is the subject. Practice and copy but remember you have your own style.
Jim October 16, 2016 at 10:16 am #1258854
Hello Richard, you don’t say if you live anywhere near the sea so I’m assuming you don’t just from the fact you would be more aware of how the ocean actually works. With waves it’s all to do with tension. The big swell is exerting tension on the water in front of it as it sucks the molecules back to continue what is, in effect, a rolling motion. (Google, ‘How waves work or somesuch.) This tension has therefor flattened the water in front so there is no chop as such.
In your example one you have a really nice big swell which runs across the whole piece. Just behind the next wave down you have some nice blue white foam. If you had just run the swell down, with brush strokes following the angle the wave is running, and blended it with that blue/white with free and frisky brush work then working backwards, wet into wet, towards the base of the swell, following your original brushstrokes, with a flat you should have created a surface more flat and lifelike. When that’s dry you can then glaze in some sky tones and add foam patterns.In example two it seems you’ve understood you included far too many waves so the learning curve is going up. Great stuff. Don’t for heavens sake get disheartened. I’ve been painting the ocean for just over 50 years and I sometimes nearly get there.The work you’ve done in example one is very good with nice loose brush work and a good sense of movement in the water which is the main ingredient in marine art.
regardsBryan
A house containing original art becomes a home
October 16, 2016 at 12:22 pm #1258862Hi Richard and welcome. I did that lesson too . Looks pretty good, especially if you are totally new at this. I was much worse. haha
Here is what i think important.
Amount of paint. When underpainting the clear water it is extremely important to lay in paint thinly. Scrub it in. That does not mean adding thinner to paint. This way second layer ( your sky reflections and foam etc) is easier to add. Novice painters, me included, always put more paint then necessary and create a mess. Shave off the excess paint and start over if you do.
Light. In this lesson there is a strong sense of sunshine. To have that you need strong shadow. No shadow – no light. Novice painters always put light and shadow with same white color. The painting as a result looks flat and has a feeling of an overcast day. Make a pile of blue and put this on the face of the wave, and make a pile of yellow white and put it ONLY on top of the waves. Reflections I always lay in wet on wet. Foam either way. One good way to do foam is to wait for the painting to dry totally, then on the surface where you want foam put a very thin amount of liquin or whatever medium. Then add foam patterns. This way you can always gently wipe them off if you are not happy and start over.
This lesson i think is quite challenging. There are tons of free lessons on youtube . I like this one.
https://www.youtube.com/watch?v=vH8xAeu6njYAlso you can see examples of Robinson’s and Byron lessons there. I bought every lesson. it was worth it.
Copying is the best way to learn, all great masters did. You would not start learning to play guitar by creating your own music , right? You learn notes and chord and others’ songs first.
Hope this helps and good luck .
Alex
October 16, 2016 at 6:03 pm #1258868Hi Richard and welcome. I did that lesson too . Looks pretty good, especially if you are totally new at this. I was much worse. haha
Here is what i think important.
Amount of paint. When underpainting the clear water it is extremely important to lay in paint thinly. Scrub it in. That does not mean adding thinner to paint. This way second layer ( your sky reflections and foam etc) is easier to add. Novice painters, me included, always put more paint then necessary and create a mess. Shave off the excess paint and start over if you do.
Light. In this lesson there is a strong sense of sunshine. To have that you need strong shadow. No shadow – no light. Novice painters always put light and shadow with same white color. The painting as a result looks flat and has a feeling of an overcast day. Make a pile of blue and put this on the face of the wave, and make a pile of yellow white and put it ONLY on top of the waves. Reflections I always lay in wet on wet. Foam either way. One good way to do foam is to wait for the painting to dry totally, then on the surface where you want foam put a very thin amount of liquin or whatever medium. Then add foam patterns. This way you can always gently wipe them off if you are not happy and start over.
This lesson i think is quite challenging. There are tons of free lessons on youtube . I like this one.
[url]https://www.youtube.com/watch?v=vH8xAeu6njY[/url]Also you can see examples of Robinson’s and Byron lessons there. I bought every lesson. it was worth it.
Copying is the best way to learn, all great masters did. You would not start learning to play guitar by creating your own music , right? You learn notes and chord and others’ songs first.
Hope this helps and good luck .
Alex
Thanks for the tips Alex – right on my wavelength

You’re absolutely right about the scrubbing in, I definitely was getting too much base colour down. Scrubbing it in an not piling it on has helped already.
When you say put blue on the face of the wave and yellow white on the tops, do you mean paint the whole of the face of the wave, or just paint “chops” or lines to indicate the texture of the water surface?
I’ve got Byron’s videos – he’s my favourite seascape painter by far. I think part of my problem has been starting on Byron videos and then moving to E John Robinson. Their styles are subtly different and that threw me a bit.
Next I need to work on shape, am struggling to get the surface of the sea looking 3D.
Thanks for the video link, I will have to try that one. Have been watching a lot of MuralJoe vids on YouTube too. He’s got some great vids on painting water.
Cheers
October 16, 2016 at 6:50 pm #1258861a couple years ago i ordered the dvd from WC own Byran Pickering , it is a great video on painting the wave, lots of color mixing info. well worth it
Ronnie
October 17, 2016 at 10:16 am #1258869a couple years ago i ordered the dvd from WC own Byran Pickering , it is a great video on painting the wave, lots of color mixing info. well worth it
Ronnie
Cheers Ronnie.
I bought Byron’s videos, have just re-watched “The Protector” and watching it the second time around it all made a lot more sense. I’m going to apply some of his methods to the E John Robinson “North Atlantic” that I’ve been copying.
October 18, 2016 at 3:56 am #1258870More practice on painting wave textures (chops)…
I’ve painted over the original attempt at the wave surfaces. I thought I’d include the full image this time not the crop of the distant wave detail to give more of an idea of the original composition.
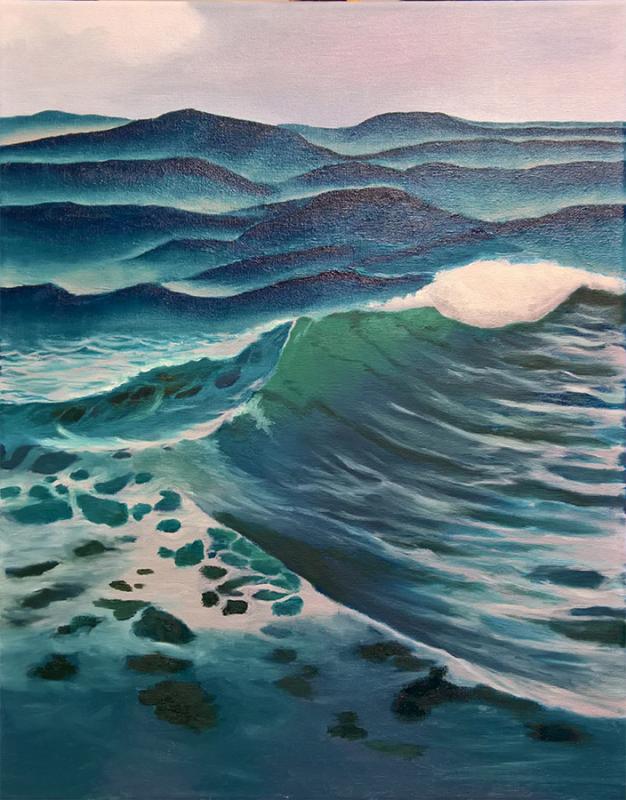
The foreground I’m happy with, just need to refine and detail it. The most distant wave on the left needs a bit of adjustment – it doesn’t look like it belongs in the scene. As for the other waves I can’t help thinking they look a bit too contrasty and maybe too cliff-like. They seem to be standing vertically, however they aren’t a million miles away from the values in the book I’m working from. So I might just go with it and paint on the chops and see how it unfolds. At this stage the painting is dry so i’ll be working wet on dry this time.
Alex – I had a go at the Aussie waves lesson on YouTube.
Oh dear
I made a bit of a Horlicks of the wave caustics, and then couldn’t get the wave troughs anything like he did. One thing I’m learning is that whatever technique needs to be used in oils is different to the technique these guys use with acrylics. Seems the oils blend much more readily than the acrylics, and I presume that the acrylic guys are making use of the fast drying times to work wet on dry(ing).
Also had a go at copying a Mural Joe waves tutorial on YouTube – https://www.youtube.com/watch?v=-9uRdBWnspY I actually bought the full length version of this one.

Once again, it’s difficult as a beginner to translate from Acrylic techniques to something that will work in Oils. The theory is there but I’m not able to get to the point where the paint pops out as a 3D objects yet.
I feel that as soon as I can get a few brush strokes to look like choppy wave patterns on the surface of the water the penny will drop and I’ll be away.
Thinking I might do some practice on rippled water surfaces instead of choppy to see if I can get my eye in that way. I recently finished a painting of some local coast line and had a lot more luck with the calmer water on it.
Any technical tips greatly appreciated
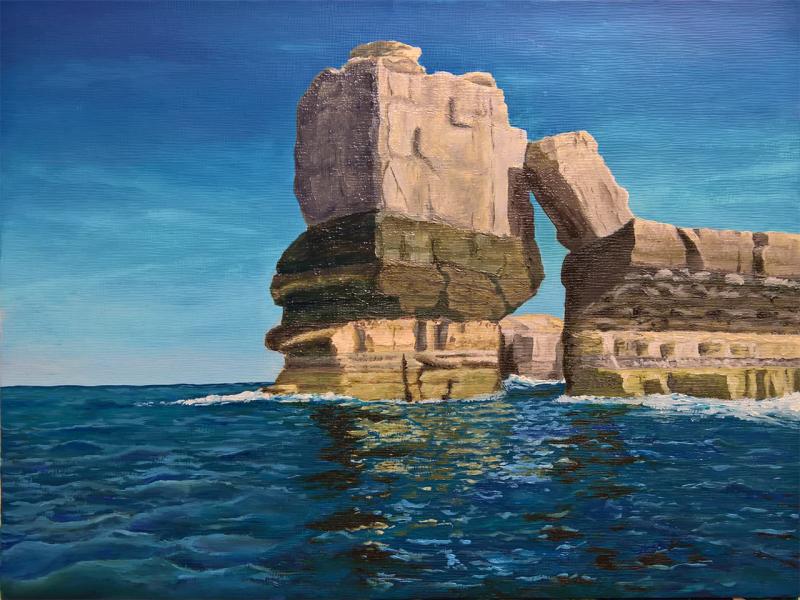
October 18, 2016 at 6:26 am #1258855Richard you say that in your new painting the background waves appear cliff like and so they do. I’m amazed you can’t see it Richard. Why does your large foreground wave appear curved? To me, it’s because there are directional brush strokes of paint telling my eye it is so. Try painting similar strokes on the background waves……
The painting of the sea stack is a really nice piece.
Bryan
A house containing original art becomes a home
October 18, 2016 at 6:57 am #1258871Richard you say that in your new painting the background waves appear cliff like and so they do. I’m amazed you can’t see it Richard. Why does your large foreground wave appear curved? To me, it’s because there are directional brush strokes of paint telling my eye it is so. Try painting similar strokes on the background waves……
The painting of the sea stack is a really nice piece.
Bryan
Thanks Bryan,
I can see the cliffs – but it’s just the underpainting at the moment. At this stage it looks (fairly) similar to the same stage in the book I’m working from. Next stage is to add details (similar to the big foreground wave) to create the shape.
The bit I’m having trouble with is the next step of adding detail.
But this time where I’m working wet on dry I’m hoping that if I fluff it up I can wipe the paint off and have another stab.
October 18, 2016 at 8:16 am #1258856Richard, before you begin to add detail to the background waves you already have a small problem in that your big foreground wave is running at an angle of around 25 degrees left to right off the horizontal across the piece whereas, at this moment, your background waves are appearing horizontal, ie parallel to the horizon.
Why not take this opportunity to adjust this with a quick retouch and at the same time introduce some directional strokes to indicate curvature.
I expect you have read the offered recipe on getting this far plenty of times so you must almost know it off by heart. Looking at the really nice sea stack piece you’ve posted my advice would be, shut the book, put it back on the shelf and go with your instinct from here on in.
One last thought, have you got the mirror and how often do you view the piece with it?Bryan
A house containing original art becomes a home
October 18, 2016 at 8:25 am #1258872Richard, you already have a small problem in that your big foreground wave is running at an angle of around 25 degrees off the horizontal across the piece whereas, at this moment, your background waves are appearing horizontal, ie parallel to the horizon.
Why not take this opportunity to adjust this with a quick retouch and at the same time introduce some directional strokes to indicate curvature.Bryan
Thanks Bryan. I’m closely following the original composition by E John Robinson. If I deviate from that it’d just add even more variables for me.
October 18, 2016 at 8:31 am #1258857Blimey that reply was quick…I hadn’t even finished typing going slowly as I wanted to make sure I covered everything…
BryanA house containing original art becomes a home
-
AuthorPosts
- You must be logged in to reply to this topic.
Register For This Site
A password will be e-mailed to you.
Search