Home › Forums › Explore Media › Sculpture › racoon knight
- This topic has 28 replies, 5 voices, and was last updated 5 years, 11 months ago by
 Charlies Mum Administrator (Maureen).
-
AuthorPosts
-
April 19, 2018 at 1:15 am #454802
i was sent here by a friend, you know who you are:)
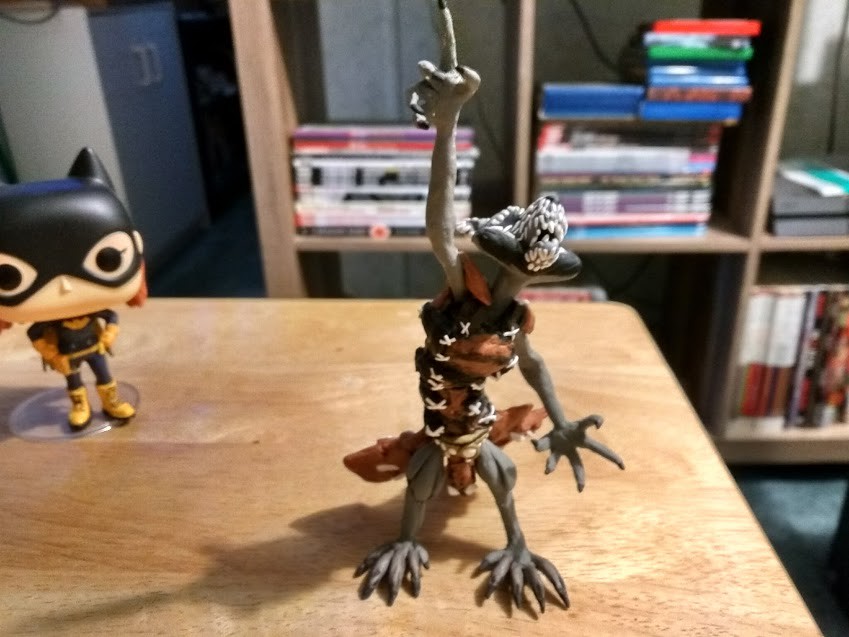
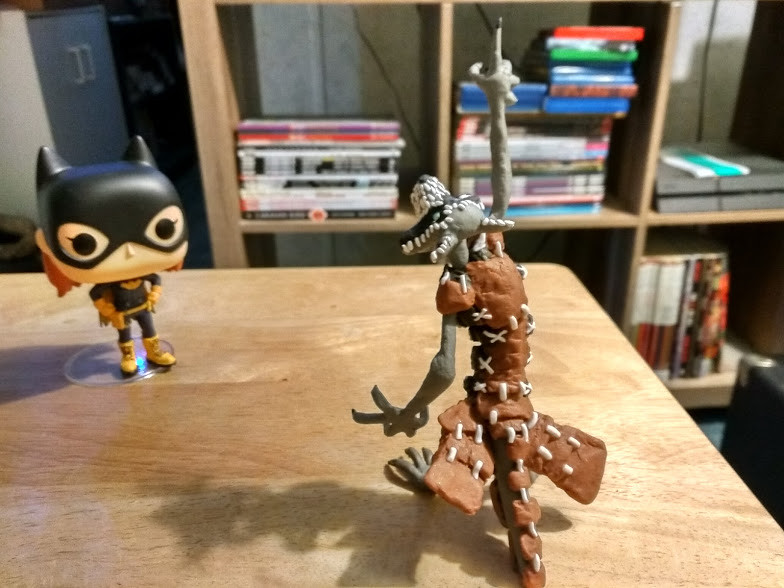
made this piece for my niece *not the batgirl on the left LOL*, she asked if i would make her a miniature, i told her i would make her anything she could imagine, she said she wanted a racoon knight. LOL… She knew i draw much inspiration from beatrix potter’s books and brian jacques redwall.
I’m actually not finished with it yet, i still have to add the sword to the hand, maybe a shield if the balance is still right.
 IMG_20180416_132435 by honey hatter[/url], on Flickr
 IMG_20180416_132521 by honey hatter[/url], on Flickr
 IMG_20180416_132609 by honey hatter[/url], on Flickr
"Oh look a white rabbit!"
April 19, 2018 at 2:49 pm #607033ZOWIE! This is my new fav figure!!!!! So cool
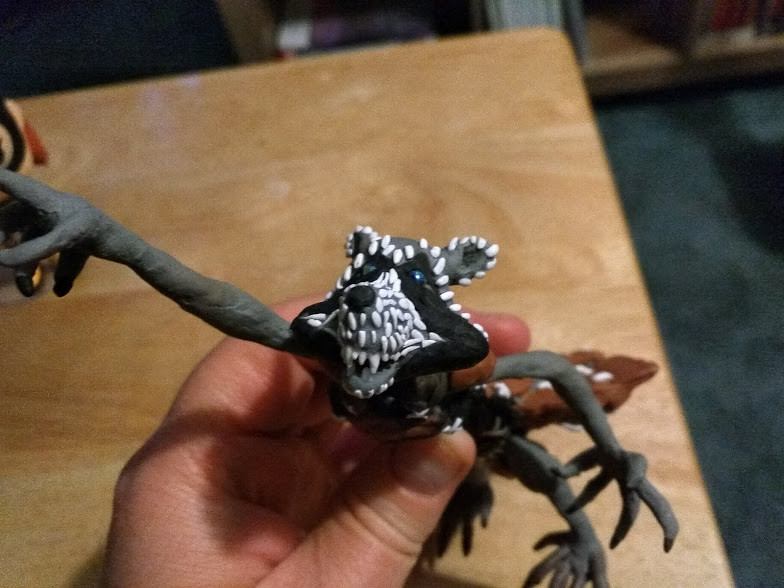
 Look at that face
 So unique, so imaginative and colorful, all that detail in a small size that reads larger than life… I’m absolutely gobsmacked!
fun, Fun, FUN

If you do add a sword and shield, I hope you’ll post those stages here as well.
Although looking at it, there is so much personality, such fierce determination, that this totally works as it is, and it doesn’t seem to be missing a single thing, if that makes sense.
Does your niece love it? Has she seen it? Has she named it?
..
avatar —name — gravity and grace along the path
nickname — intuitive balance of forces[/color]
.April 19, 2018 at 3:50 pm #607046Aloha pine cone! I will post the sword and shield for sure, I actually have the wire form of the sword already done, I want to keep the handle of the sword as is, the wire twirled beautifully, I’ll post that as it is now, I was going to wait and post the finished product. Doing laundry at the local laundry mat, it will be up soon. My niece hasn’t named it yet but good question. When she told me a raccoon knight I asked her if she wanted it to have a rocket pack, like the raccoon in the Guardians of the Galaxy movie, she said no, just a knight. I said you sure? I can make you anything your imagination wants. Raccoon knight. I could have made her a princess riding on a unicorn galloping on a rainbow. Maybe shell name the sword princess stabby 😀
"Oh look a white rabbit!"
April 19, 2018 at 9:10 pm #607047whoever pulls the sword from the stone…
 IMG_20180419_194845 by honey hatter[/url], on Flickr
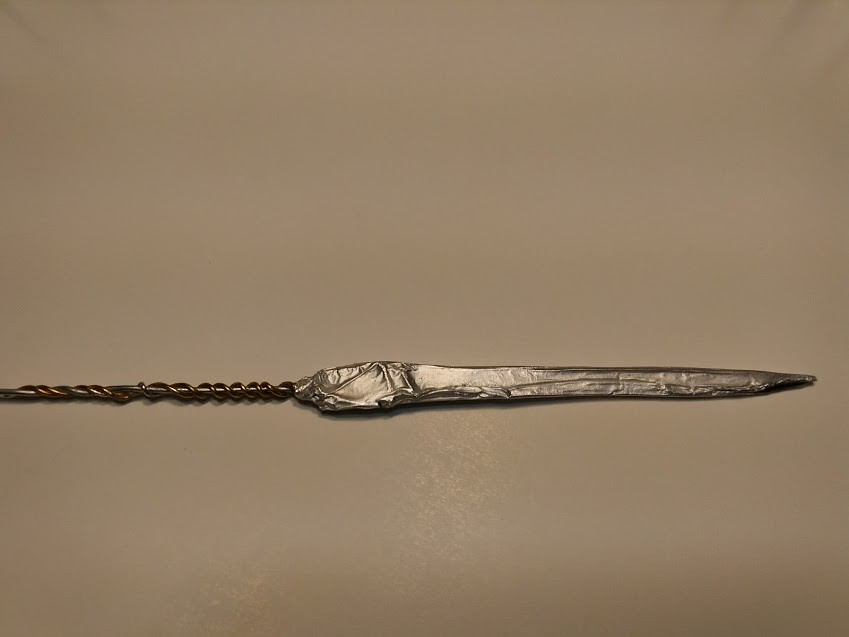
This is the long sword, there is some special history behind it, i made a miniature female mouse archer for a lovely lady on a show called critical role. This is the sword i was going to send but decided against it, the bow and arrow was excellent, anymore and it would have made the statue look off. Fast forward a couple years and my niece is getting the sword i made for a celebrity. I’ll add clay to the blade, and maybe a unicorn head for the hilt guard. Also i’m thinking about making a claymore or some other weapon that will be on the racoon’s back.
how do i edit my posts… i missed an apostrophe on my last post LOL."Oh look a white rabbit!"
April 20, 2018 at 2:32 pm #607034Wow, such great stories…
…”princess stabby”
So I’m guessing you must sell on Etsy? I hope!
You could make that “princess riding on a unicorn galloping on a rainbow” and keep it, or sell it one of your posh friends!!! But now that you’ve told us about it, you have to promise to post it here too
I sure hope if I ask if you’re a full-time creator, you’ll say “Yes!”
I love the look of your sword so far. How do you add the clay to the blade? I’m picturing a slice on each side, but I know if I tried to blend the seams, something would smush out one way or another. How do you do it?
And I love the look of your wire wrap for the handle. Nicely done.
Can’t wait to see the next pics… *taps foot*
.
avatar —name — gravity and grace along the path
nickname — intuitive balance of forces[/color]
.April 20, 2018 at 4:07 pm #607048Hi PC! “YES” to full time creator, never thought of myself as one but it fits.:) The sword I add sculpey bake and bond glue to the blade & shape it, after I’ve done the hilt guard in the same way I bake. If I need to I carve away at it to add sharpness. I have thought of doing Etsy, I may do. No posh friends here except you PC lol. I have too too many projects I have to create, after I finish this one I’ll do a lion king scene with rafeeki and pumba. After that I have a project I’m anxiously awaiting to create its a passion project, a vampire stalking prey. Can’t wait.
"Oh look a white rabbit!"
April 20, 2018 at 6:57 pm #607035Bonjour HH
and I’m so glad you said YES :thumbsup: Picture “posh.” Then picture the exact opposite. There I am. That’s me I’m still clueless on the blade *sorry* Okay, so do you have a thin slice on each side, and you just glue them like that? And you don’t worry about the seams – just carve them after?
The carving part makes sense to me oddly enough, because I carved one of the experiments years ago. I carved grooves in a little grunge piece before I painted it. I was surprised to find out it was carvable, but it worked out
But it’s the part BEFORE you carve it that I don’t understand. I have some Sculpey B&B but I’ve never used it.
I love polymer clay but have precious little experience with it. Just a few experiments (and nothing for several years). Hence all these questions. Sorry :o
.
avatar —name — gravity and grace along the path
nickname — intuitive balance of forces[/color]
.April 20, 2018 at 9:01 pm #607049Hi PC I taught myself to create armatures out of necessity as my skill at making miniatures evolved, I started making miniatures 5 years ago, I’m 45 now. Before that I drew a lot, although I was never as good at drawing as I wanted to be. Getting the creation from my mind to page never seemed to work however I could draw still life drawings all day. I gave up drawing for a few years, when I picked up some polymer clay it was like my hands instantly knew what to do. At first I wasn’t very good at making wire armatures, I’d seen people on YouTube make them, it wasn’t until I put some concerted effort that I made my first armature, after I did I saw how much better it was posing the piece I was working on. The clay would naturally cling to my armature, I usually add aluminum foil around the armature to give the piece more body to the skeleton. I use sculpey bake and bond all the time, I’ll apply it to the aluminum body and add the clay around it. I used the same process for the sword with an extra added step. I go to my local hardware store for metal flashing, they use it on roof construction so roofs don’t leak I think. I use this easy to cut metal flashing, it’s nice because it’s a thin sheet of metal, but nice because it’s sturdier than aluminum, when I made the sword I made a paper template drawing out the shape of the blade I wanted, I traced that onto the flashing and cut it with my metal shears which I also got at the hardware store🙂 I took a section of straight wire, wrapped it around the bottom part of the blade, wrapped some more wire around the straight section which is the handle you see. I applied some bake and bond to the blade, put some aluminum over that and baked it viola there is the blade you see. It’s a simple technique that works well whether making armature or weapons. To me, my imagination is one of the most important tools in my art. It wasn’t until i stopped drawing, I loved it very much and still do. But knowing myself and what I’m good at finally, I was able to fully connect with my mind and imagination. Like soooo many great artists I see who can draw/paint they have that connection to there imagination that I was seeking for a long time. Now when I go to create a piece, I don’t make anything until I imagine it fully in my mind first, there is some wiggle room there. Sometime my hands will know what to do, and something better than what I imagined will appear… I hope I made some sense… Oh look a white rabbit!
"Oh look a white rabbit!"
April 20, 2018 at 9:38 pm #607044April 20, 2018 at 9:55 pm #607050Thanks selected, I love that mad hatter’s clock your working on. Come to think of it I love the mad hatter. I don’t know how you do what you do but it is very skillful and brilliant workmanship.
"Oh look a white rabbit!"
April 20, 2018 at 9:58 pm #607036HH, thank you so much for the info. I love hearing about your background. The deep affinity you feel inside for polymer clay shows so beautifully (and almost radically) in the joy and confidence of your creations.
You are really truly an artist following your calling and your heart.
And so you’re an inspiration.
And I love that tip about the metal flashing! What a great idea!
But speaking of failure of imagination, I can’t picture what you do BEFORE the carving, but after the flashing in the pic.
Here’s why I keep asking….. Several years ago, when I was doing those few experiments I mentioned with polymer clay, I had an idea to make some long polymer clay tubes (maybe 3″ long). I was going to make the tubes, bake them, then add them to an acrylic painting I was working on back then, and make it a mixed media painting.
There was a tutorial on Etsy that I bought and it showed how to “easily” make small diameter tubes by rolling the clay around a thin dowel like a small knitting needle, etc. I went out and got some really, really thin knitting needles, put cornstarch on ’em like I was supposed to (so I could get the clay off after it baked) and tried to make the tubes.
But the clay would just get bigger and bigger and saggy. I don’t know if my hands were too hot or what. I tried putting one of those frozen blue blocks like they have for picnic chests under my tile to try and keep things cooler, but I never could make it work. None of my attempts even got as far as the oven.
It’s supposed to be easy. But trying to get clay around another surface without it all going smushy and sagging away, turned out to be impossible for me.
So that’s why I keep asking how you get the clay to fit around the blade without the blade smushing through on one side or the other.
..
avatar —name — gravity and grace along the path
nickname — intuitive balance of forces[/color]
.April 20, 2018 at 10:29 pm #607051PC I’m happy to wrap my brain around this for you and see if I can come to some solution, also when I do my blade work I’ll add some more detailed pictures step by step. I’ll see what I can come up with the straw of clay. I’m just thinking out loud here, when I apply clay to my figure that has wire and aluminum, my fingertips can get sticky I use the handy wet wipes to clean my fingertips, when I go to touch the clay again it will still be tacky to the touch but my clean and dry hands take some of the tack out of the surface of the clay. I’m then able to manage the clay on the figure and shape it to my liking, I do this in sections with small portions of clay. Clay does tend to have a mind of its own when it’s baking it does expand and contract. I’ll see if I can come up with something.
"Oh look a white rabbit!"
April 20, 2018 at 10:59 pm #607037Thanks HH!
Those tubes never made it to the oven. They lost their shape totally before I had even really shaped them. I could never get a single tube to be an actual tube. So there was really nothing but a smushed mess. So I never baked them.
You don’t have to help me with that though. It’s ancient water under the bridge.
Your tip about the wet wipes sounds very promising though!
I’m just curious how you attach the clay to your blade without it losing shape. I’m looking forward to seeing the pics.
Thank you so much!
.
avatar —name — gravity and grace along the path
nickname — intuitive balance of forces[/color]
.April 20, 2018 at 11:49 pm #607052I’m still going to try something with the clay straws, actually I’m laughing very loud at you trying to talk me out of it now. Thank you for my joke of the day PC
Getting clay to stick to sculpey glue is the easy part, using to much glue can turn the clay to mush, the less you manipulate the clay after you have applied it the less chance the glue has to work its way through the layer of clay you have applied. Because I’m always making armatures I’m creating a foundation for the glue and clay to be applied to. The stronger the foundation the more chance you have for your clay to be strong as well. Going from one strength to the next. For the blade I roll out a thin sheet of clay lay the sword out on top of the sheet, cut around it like you would a cookie on a cookie sheet. For the other side I cut the same shape section, carefully pick up that piece and lay it over the top of the blade gently pressing the clay onto the glue and joining both sides of the clay together with my fingertips. My favorite tools are my hands. I’m sorry if I didn’t explain this well enough before PC, my mind is often chasing rabbits down holes:) I’ll add lots pictures for this process. It’s not a hard process, I always tell people anyone can do what I do with polymer clay. The hard part is bending wire around wire to make whatever foundation you wish to make. After that, the foundation/armature what have you, the wire support tells the clay what shape it should be. Whether it’s a miniature wire sword or a miniature statue, the wire, aluminum, and glue are all tools and technique to bend the clay to your will, or smush the clay, or gently press the clay:angel:"Oh look a white rabbit!"
April 21, 2018 at 5:21 am #607038You crack me up HH
I didn’t want to hijack your Raccoon Knight thread for my problem.
But here’s what I did. I started a thread for it over in Polymer Clay. That way, I’m not hijacking your thread for it anymore. Here’s the thread:
https://www.wetcanvas.com/forums/showthread.php?t=1446574
But honestly, I don’t think there’s a solution.
————————-
Now back to the KNIGHT!!! and the SWORD, aka “princess stabby”…..
Thank you for that description. Everything you said makes a lot of sense. And I made some notes. I’m eager to see the pics! It’s going to be really cool[/color]
l[/size].
avatar —name — gravity and grace along the path
nickname — intuitive balance of forces[/color]
. -
AuthorPosts
- You must be logged in to reply to this topic.
Register For This Site
A password will be e-mailed to you.
Search