Home › Forums › Explore Media › Watercolor › The Learning Zone › Making a Color Chart of Your Paints
- This topic has 29 replies, 24 voices, and was last updated 7 years, 4 months ago by
 Diane Cutter.
-
AuthorPosts
-
February 21, 2008 at 4:32 pm #986978
A couple of years ago, I made a chart of all the paint colors I had at the time and showed it here. It worked fine, but I realized as I bought new paints and acquired different colors, I had nowhere left to add them on my chart.
So I recently made a new chart which I think will work even better than the original one did.
Depending on how many paints you own, this will probably take several hours to complete, but it is a soothing kind of activity and fun.
Step one: Take a sheet of the paper you normally paint on and fold and tear it into smaller pieces—mine are 8″ x 12″. It’s important to use the same kind of paper you paint on so you can see what the paints are going to look like on it.
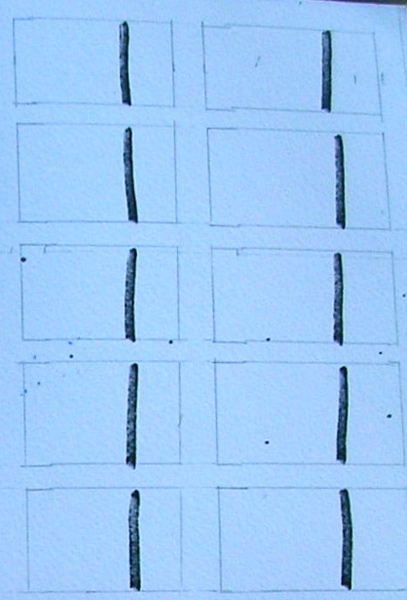
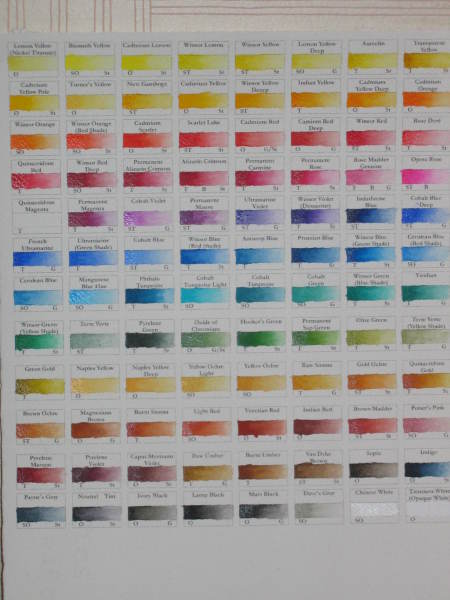
Step two: With a ruler, divide each piece into columns of rectangles leaving space between them to write the name of the paint and the manufacturer. With a black indelible marker pen, add a line on one side of each rectangle. Here is a section of one of my sheets:
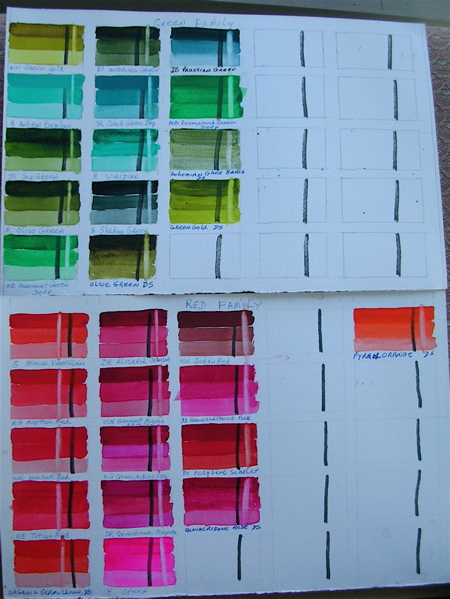
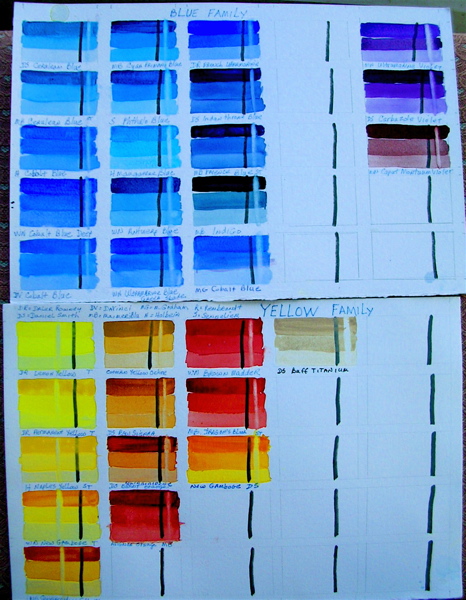
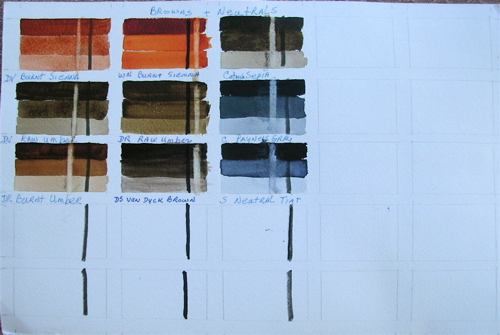
Step three:Divide your paints into color families and begin painting your chart. At the top of each rectangle, paint a strip of color that is right out of the tube (add a tiny bit of water to make it flow if necessary). On your palette, water down some of the paint to a thin hue and paint a strip in the same rectangle at the bottom. When these dry, make a mid-tone mixture of the paint and finish the center of the rectangle so you have a gradation of shades for each paint.
Do this with all your paints from one family. Be sure to add the name of the color and the manufacturer at the bottom of each rectangle. I also add the Color Index number (e.g. PY3 for Lemon Yellow) and a small square showing if it is transparent (empty), semi-transparent (half filled), or opaque (filled).
You could use both sides of each sheet to do this, thus cutting down the number of pieces you need.
Step Five: You can tell how opaque a paint is by looking at how well it covers up the black stripe you added before you put the paint on. To see how easy the color is to lift, moisten your small brush with water and paint a stripe next to the black one. Blot with a paper towel. Repeat until you are back to the white of the paper, if you are able to get there.
*************
I use this chart when planning colors for a painting. It is easy to hold up my reference next to it to see which color is closest.
I also like looking at all those luscious colors.

Hope this has been helpful for you.
Sylvia
February 21, 2008 at 4:52 pm #1098037Wonderful job Sylvia, we had to do this in my college watercolor class. It was fun. I’ve never done it with my paints lately though so just might give it a go.:thumbsup:
Darla
If I create from the heart, nearly everything works: if from the head, almost nothing. — Marc Chagall
February 21, 2008 at 6:10 pm #1098047Thank you Sylvia,
I found that to be helpful in another way: I magnified my screen to read what was what and saw a couple interesting colors. The nice thing was that I could see colors I don’t have in relation to colors I do, regardless how accurate my screen or your scanner/camera are.February 21, 2008 at 6:46 pm #1098050Sylvia!
You have absolutely just read my mind!!! I was just thinking today that I need to make a chart of all my colors…I was mulling over how I would approach this task…mine would’ve ended up slop compared to this.
Thank you for this timely guidance…I’m going to give you a mentor point for sure….
February 21, 2008 at 7:02 pm #1098038Always a great idea to mark charts of your colors. This method really works to help you understand what you have in front of you.
Mike ------- see my progress through the work that I share on my website

Newbie Help Posting Guidelines User Agreement Watercolor Handbook
GIMP ArticleFebruary 21, 2008 at 7:24 pm #1098048I also like looking at all those luscious colors.
Me too! Sometimes I just look at my chart and smile. All that potential!!
This is a great method of charting – it gives one lots of info at a glance. Thanks for sharing your method!
Noelle
February 21, 2008 at 11:16 pm #1098036I really like the working size of your sheets, Syl… I think that I’ll redo my own charts, organizing them into families…
I’m giving you a Mentor Point!
Char --
CharMing Art -- "Where the spirit does not work with the hand, there is no art." Leonardo DaVinci
February 22, 2008 at 5:30 am #1098032Thank you all so much for your lovely responses to my charts. I think it is a worthwhile endeavor to make.
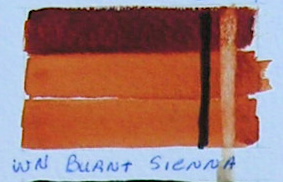
Another thing this has done is to show me the differences in paint colors from manufacturer to manufacturer. Check out the Burnt Sienna in the last chart, for example. The one on the top of the first column on the left is by DaVinci and the one on the top of the second column is by Winsor & Newton. Quite a difference there, isn’t there, even though both have the same name. (I no longer have the DaVinci one, I like the WN much more.)
Have fun if you decide to make a chart of the colors in your kit.
Sylvia
February 22, 2008 at 12:54 pm #1098045 Thanks Sylvia….
Here is my chart which I had posted yesterday in another thread https://www.wetcanvas.com/forums/showthread.php?t=478442 goto post no 15. You can see it with the paint caddy there.This is a W&N set… I have the information of the manufacturer typed in… as T/ST/O (Transparent/Semi-transparent/opaque) and then St for (Staining)
G for granulating etc. I have it stuck on the wall in front of me on top of my paint caddy where I can refer to all this info while I am picking a color…
I have done graded wash on each box so I can see from the purest out of tube intensity to the lightest.. almost water.
Sorry the purest pigment is reflecting the camera’s lash and hense shiny in the picture!February 22, 2008 at 3:13 pm #1098041 Thanks so much Sylvia!
That is a lot like my charts,but way much better organized!:p
I have mine in a three hole binder. I did have them hanging up on the wall, but my wall was getting crowded. I like the binder, keep it within arms reach to grab when I need it.
But, as I have added new tubes, and they are at the end of the list, I think I may go back and better organize the whole bunch!
Thanks for the ideas and inspiration!:clap:Cheerio,
ElsieFebruary 22, 2008 at 3:25 pm #1098040I did my color chart layout so it mirrors my palette layout. Extra colors not on my palette go in the center. Actually I for awhile they were in a small CJA add on palette, so I replicated that layout in the center. Recently I switched palettes, so now it;s not identical, but still close enough to work. I hang it in my workspace right above my palette so it is an easy check while working!
You can see it here:
https://www.wetcanvas.com/forums/showpost.php?p=5146569&postcount=27I agree with
I also like looking at all those luscious colors
Lorraine
Thanks for inspiring me![/COLOR]
Enjoy my contributions to RIL here https://www.wetcanvas.com/RefLib/showgallery.php?cat=500&ppuser=61016February 22, 2008 at 4:51 pm #1098044Good job!! giggling… I wish I had been able to stop at the point you did Sylvia. My color studies books are now monsters that are eating me alive! I did figure out a way to insert pages into the binding of the book I used. That’s saved me now that I have all these new DS Triads!
[FONT=Arial]I'll check in again as soon as I can.
[/COLOR]
[FONT=Arial]____________________________________________
[FONT=Arial]Laura
[FONT=Arial]***"Work like you don't need the money. Love like you've never been hurt. And dance like no one is watching." – Anonymous!*** [FONT=Arial]http://www.lauradicus.comFebruary 22, 2008 at 5:18 pm #1098046Hi Sylvia
Another, and immensely useful, lesson I learned from you!
I made a chart based on your older plan a few weeks ago, six colums wide x 8 colours deep, with the vertical lines for transparency and staining properties, and a note of the name, maker and pigments used for each colour. The six columns are organised in red, yellow, green, blue, violet and earth families. Only the red is full at present, although the yellow, blue and earth columns have only one space left.
When I need more, I can just cut the columns into strips. At that time I plan to put a hole at the top of each column and join them with a wing opening thingie (forgotten what they’re called) so they can be easily fanned out.
I also made another chart which shows the layout and colours in my two permanent palettes – 34 colours! but I now find I use less than half this number regularly.
I told you yesterday you were my mentor – here is another example!
Thanks for another piece of great advice.
Regards, Pam
February 23, 2008 at 5:10 am #1098033Srishti,
What a lovely chart that is, so nice and neat. Good idea to add the info from the manufacturer about transparency, etc. Elsie,
The binder for holding your chart is a good idea also, keeps it neat and clean and handy.Lorraine,
Another good way to use the chart so it harmonizes with your palette. I keep mine right next to my paint table for easy access when I need it.Laura,
You are so organized. Yes, the DS triad shoppers are having to update their charts a lot these days. I saw the latest triad offer in my Watercolor Magic book includes a free brush! It’s tempting. Pam,
Good idea to cut the strips apart, then you can always add new strips with your new colors easily also. I still use my original chart, I just folded it up and carry it back and forth to my art class in my tote bag.I also made a drawing of which colors I have and where they are in my palettes (I have two) so I can refer to it and see exactly where a certain red is or blue, etc. Can’t rely on my memory any more.
Thanks all for the great ideas and for sharing them here.
Sylvia
February 23, 2008 at 10:43 am #1098053I did what our Senior Member from Yakima did.
I did a color wheel with my paints, listing mfgr.
I keep ‘um all in a stack and use the same 4-5 colors every painting. Plus 2 or 3 new ones from Daniel Smith.But, it is much fun to make the charts and wheels.
-
AuthorPosts

- You must be logged in to reply to this topic.
Register For This Site
A password will be e-mailed to you.
Search