Home › Forums › Explore Media › Pen and Ink › Calligraphy › Celtic Knots 101 – Spirals
- This topic has 46 replies, 16 voices, and was last updated 12 years, 1 month ago by
 Autumnwillow.
-
AuthorPosts
-
December 23, 2006 at 7:06 am #986126
Ok, no I’m not really ready to get this thread up and running yet. But in the interest of letting anyone who wants to play along to gather supplies, I thought I’d go ahead and post. That and I’ll feel reaaallllllyy guilty if I take too long getting back to this. So! Here’s the shopping list:
Compass – doesn’t need to be big & fancy. Although better quality tends to pay for itself in the long-run.
Protractor – I prefer one that’s a full circle. But use what you’ve got handy or can find easily. Once you’re thoroughly hooked on the spirals you can upgrade.

Ruler – Once again, doesn’t need to be over-the-top. But if you can, get one that’s see-through.
Sketch paper/drawing paper – nothing fancy. Just pick something that’ll take a lot of erasing.
graph paper – won’t be using this a whole lot, but you may want some handy to work out a pattern before trying to bend it.
Pencil, Eraser, and , um, that’s it!
Not too esoteric or out there as far as supply lists go…
Couple of books you might find handy (not needed to participate):
Celtic Design: Spiral Patterns by Aidan Meehan
Celtic Designs from the British Museum by Ian Stead & Karen Hughes (this one may be out of print, so check the used market or your library)
Celtic Art: The Methods of Construction by George BainTess
[FONT="Palatino Linotype"]Rosemary (aka Tess) - [/color]
[FONT="Book Antiqua"]How does she do that??? Find out here:[/color] Celtic Art 101

Do not meddle in the affairs of Dragons, for you are crunchy and good with ketchup.[/left]December 29, 2006 at 12:06 pm #1079221Actually, I’m breaking this tutorial into 2 parts. I’ve gotten a little long-winded… :rolleyes:
Regardless, the supply list is the same.
Tess[FONT="Palatino Linotype"]Rosemary (aka Tess) - [/color]
[FONT="Book Antiqua"]How does she do that??? Find out here:[/color] Celtic Art 101
Do not meddle in the affairs of Dragons, for you are crunchy and good with ketchup.[/left]January 6, 2007 at 8:46 am #1079222I’m getting the examples together for spirals, so in the meantime, here’s a little bit to get y’all started:
For the record, I love spirals. From a simple, single band curling to the truly wild & almost frantic energy of the really detailed triskeles. With the spirals, you’re drawing pure energy. They show up in archeological finds from all over the world. They were used to portray everything from the divine feminine to the path our souls take when we pass from this world to the next. For our purposes, we’ll be focusing primarily on two styles. The earliest, the La Tene style, is found on artifacts from the iron age. The second is the High Kells style, which clearly grew out of the first.
The La Tene style is easily identified by it’s loose & fluid movement. It meanders. It wanders, tightens, loosens again, and slips away to the next element. The High Kells spirals are almost frantic, very tightly wrapped, highly detailed, and almost overwhelm the text they were meant to illuminate. An argument can be made that the differences between the two show the difference between the artists’ world-views. First is the older, pagan perspective of seeing the chaos of the natural world & trying to move in harmony with it. Then come the monk/scribes with the Christian perspective of man having dominion over the natural world (following that metaphor, it almost appears nature is winning
). While I think that does have something to do with it, I also strongly suspect that the advancement of humanity as a whole & technology comes into play here, too. Better tools mean you can do *more.* And I bet it’s a zillion times easier to do major detail on vellum than in bronze or on stone!So to get you familiar with some of the artifacts & give you an idea of the general feel for things, give these websites a gander:
Celtic Art & Culture Image Search — under the period pull-down, look at both the La Tene & Insular La Tene collections. Actually, it’s all really cool, but those are the ones you’ll find the most helpful for this. And if you have the time, give the entire site a wander thru. Very cool project.
Artwork from the Book of Kells — Not terribly inclusive, but the images are really nice sized.
And do a google images search for “book of kells”. Bazillions of hits, some really good detail images.
Have fun! Hoping to be able to really get this rolling by the end of the weekend.
Tess
[FONT="Palatino Linotype"]Rosemary (aka Tess) - [/color]
[FONT="Book Antiqua"]How does she do that??? Find out here:[/color] Celtic Art 101
Do not meddle in the affairs of Dragons, for you are crunchy and good with ketchup.[/left]January 10, 2007 at 9:31 am #1079223Ok, so I missed the weekend deadline by a bit… sigh. Anyway, here’s the real start of how to do spirals:
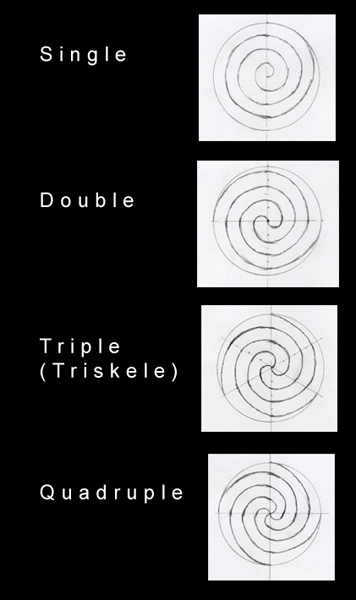
To start with, let’s look at some very basic spirals. Obviously, you can have as many bands wrapping around each other as you want, but those are the ones you’ll find the most useful.
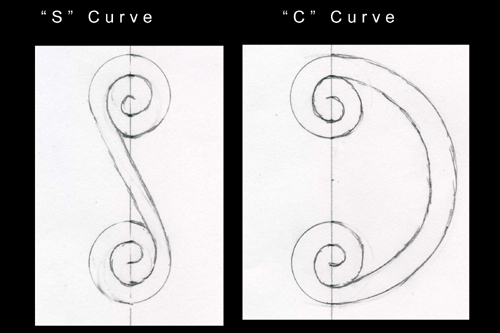
Spirals are usually joined in two ways, “S” curves and “C” curves. An S curve is usually used if everything is rotating the same direction. C curves are usually used to join spirals if they are rotating in opposite directions.
Here’s a few more examples of things you’ll want to become familiar with (note that these are how I think of them, I haven’t found a definitive description yet. Each book calls them something a little different.):
A. Single Spiral with a comma end
B. Double spiral with pointed ends & a pinwheel center
C. Double spiral with club ends & an elongated pinwheel center
D. Double spiral using pointed & comma ends with a trumpet termination
E. Two single spirals joined with an “S” curve, using a trumpet termination to change direction
F. And just for fun, a triskele & knotwork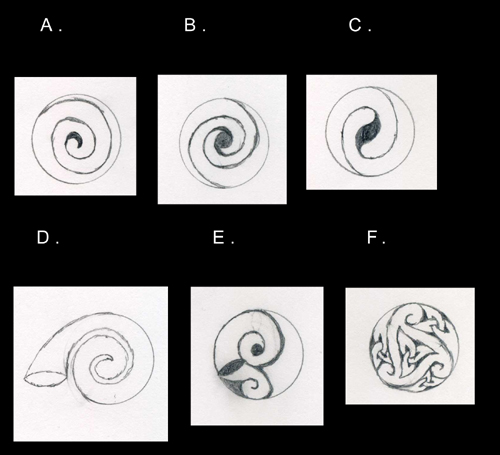
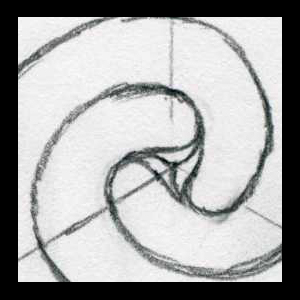
Look at example D above. At first glance, it appears to be a single spiral, with a fairly thick line separating them. Watch what happens when this gets stacked with another:
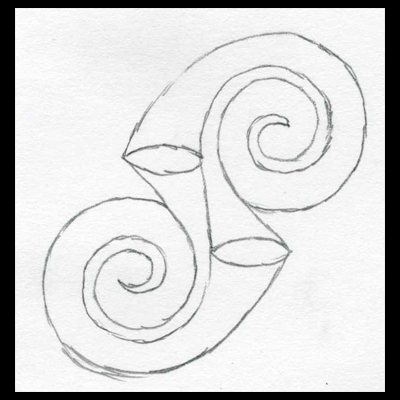
The trumpet terminations give you a graceful place to adjust the angles and allow what *appears* to be the dominant element (fatter spiral) on the upper portion morph into what defines the dominant element on the lower. We’ll play with that some more later (and hopefully not get lost in the process!)
Ready to try some of these? I should get the next part up this afternoon.
[FONT="Palatino Linotype"]Rosemary (aka Tess) - [/color]
[FONT="Book Antiqua"]How does she do that??? Find out here:[/color] Celtic Art 101
Do not meddle in the affairs of Dragons, for you are crunchy and good with ketchup.[/left]January 10, 2007 at 5:38 pm #1079224So let’s start off doing two simple, single clockwise spirals joined by an “S” curve:
Use your ruler & divide your sketch paper in half with a midline. You’re going to need 7” overall for this, so close to the middle of your line (doesn’t need to be exact), make a tic mark. Now measure up 1/2″ & make another tic mark. From that 2nd tic mark, measure another 1 1/2”. And one more tic mark 1 1/2″ past your last one. Now go back to the first tic mark and make tic marks at the same places going down your midline. Here’s how mine looks:
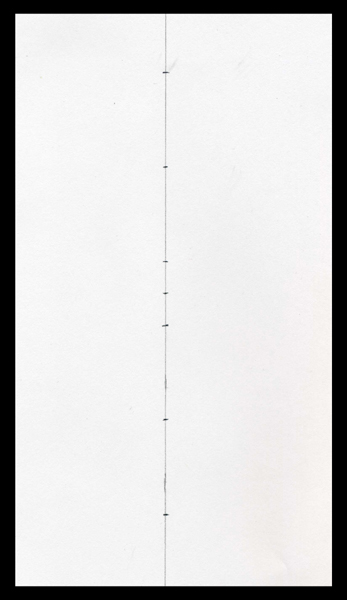
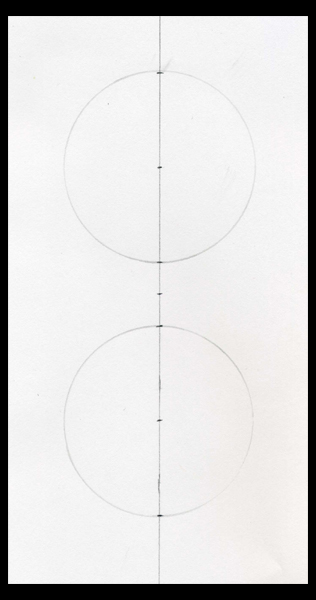
So measuring from your first tic mark along the midline with your ruler, you’ve got a tic mark at 0, 1 1/2, 3, 3 1/2, 4, 5 1/2, & 7 inches. With your compass, set the point at the 1 1/2 mark. Draw a circle 3” in diameter. Now, down at the 5 1/2 mark, draw another 3” circle.
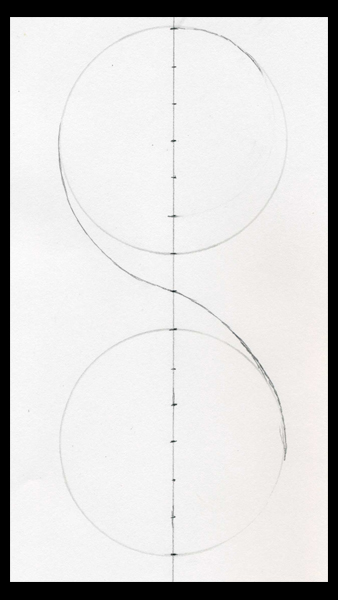
Next, if we think of the 1st circle like a clock face, draw in a curved line (don’t bother with the compass, just use your judgement) from 9 o’clock to the tic mark between the two circles. Then draw another from the tic mark to 3 o’clock on the 2nd circle. This is your guide for the “S” curve. And because I forgot to scan between these steps, take your ruler and make tic marks every 1/2 inch inside of the circles. These will be the guides for drawing in the spiral itself.
Now draw in a curve from the midline at 12 o’clock on your top circle to the 1st tic mark inside of the circle down at 6 o’clock. Make it as smooth and half-circle like as you can. If you want to use the compass, go ahead, but I find I spend an awful lot of time trying to correct how curves meet when I use it for this stage. If you use the compass, your midpoint will be at 1 1/4, instead of at 1 1/2. And because I forgot to scan between steps, draw in another curve from the same tic mark at 6 o’clock up to the 1st tic mark inside of the circle at 12 o’clock. Once again, try to make it as much like a half-circle as you can, with about 1/2 inch (the space between our tic marks) between it and the outside line of the circle.

Guess what’s next… Another curve from the 1st tic mark inside of the circle at 12 to the next available one down at 6 o’clock. Once again, try to make it as much like a half-circle as you can, with about 1/2 inch (the space between our tic marks) between it and the path you’re drawing.

And one more time from the tic mark you just used up to the next available at 12 o’clock. Don’t worry if it isn’t perfect. That’s what erasers and practice is for.

And lastly, one more curve from the tic mark you just used at 12 o’clock to your midpoint. Voila! Not too terribly hard, right?

So… ready to draw in the 2nd spiral? We’ll follow the exact same steps, only starting down at 6 o’clock on the circle & going up to the 1st tic mark at 12 o’clock. Etc. Here it is with the 2nd spiral completed:

Now let’s fill in the “S” connection. From the 9 o’clock position on the outside edge of the upper spiral, draw in a slightly curved line to 3 o’clock on the 1st inside line of the lower spiral.
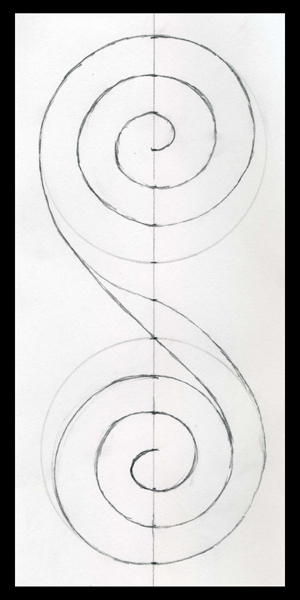
Do the same from the 3 o’clock position on the outside edge of the lower up to the 1st inside line at 9 o’clock on the upper spiral.

Erase any compass lines or guides you don’t need, and there ya go! So now what? There are a few zillion different ways to embellish these. We’ll get to those later.
Next, we’ll tackle a fairly simple triskele. Hopefully, I’ll have that up in the next few days. And as always, post or pm me if you have any questions (or catch any errors!)
Tess
[FONT="Palatino Linotype"]Rosemary (aka Tess) - [/color]
[FONT="Book Antiqua"]How does she do that??? Find out here:[/color] Celtic Art 101
Do not meddle in the affairs of Dragons, for you are crunchy and good with ketchup.[/left]January 16, 2007 at 5:08 pm #1079225This is taking me *forever* to get done! I keep getting too complicated, too fast. Hubby is enjoying my frustration & keeps saying “the best way to really *know* something is to try to teach it.” Durn him…. Grrr. Right. I think I’ve finally got it. If I do go too fast, please speak up!
Ok, on with Triskeles.
Triskeles, three banded spirals, were used repeatedly in both the La Tene period as well as the High Kells. And that probably explains my, um, thing about threes. We’ll start off fairly simple. And while working on the demo for this, I realized there is one other tool I find really really handy: A circle template like this one[/URL] at Dick Blick. Most office supplies and craft stores sell them as well. You don’t *need* it, but I hate drawing smaller circles with a compass. Mine goes from 2 1/4” down to so teensy I can barely fit a pencil in it. The other thing to remember when working with spirals, there aren’t rules like there is with knotwork. Just about anything that is pleasing to the eye goes! Which is part of where I’m struggling with the demos. I tend to let the spirals evolve on their own. The only things to pay attention to is initially dividing the circle & keeping everything going the directions you intended. Ok, enough about what I neglected to tell you at the outset…
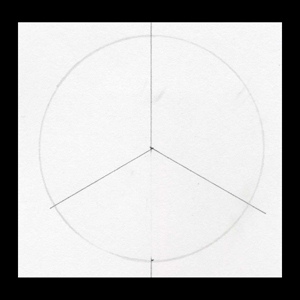
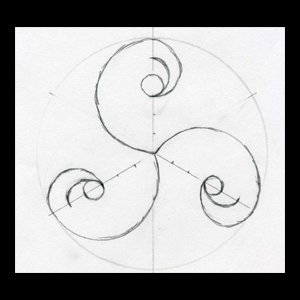
First off, let’s do a simple triskele that curls inward with club ends. So create a midline & draw in a 3”circle. With your protractor, make tic marks at 120 & 240 degrees (if your protractor is a half-circle, make tic marks at 60 & 120). Using your ruler, draw in a line from the tic mark *just before* the lower part of your midline (120 degrees) to your center point. Repeat on the other side of the lower portion of your midline (240 degrees.) If you’re working with a half circle protractor, use the tic mark at 60 (the one just past the midline on the upper portion) to line your ruler, but draw in the line on the lower portion only. And erase the lower part of your midline. Here’s mine:
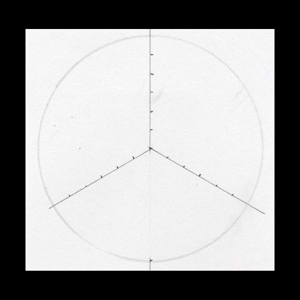
Now, on your guidelines, make tic marks every 1/4 inch. Just like on the single spiral I showed, these will guide the path of your curves.
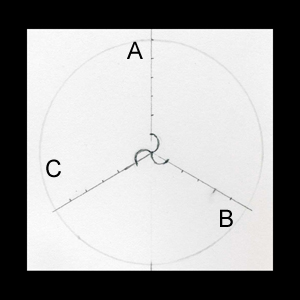
So starting at the center point, on the *right* side of your midline, draw in a curve up to the 1st tic mark. Repeat on your other lines. I like to turn the paper as I go, just to make sure I’m drawing everything on the side of the lines I mean… And to lessen confusion, let’s call the lines A for your midline, B for the line at 120 degrees, and C at 240.
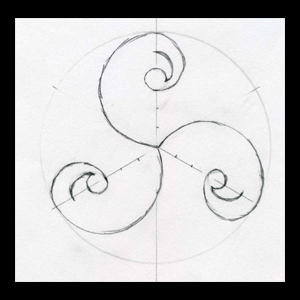
On you’re A line (midline), draw in a curve from the 1st tic mark (the one you just used) to the *2nd* tic mark on the C line. Repeat around (C to B, B to A).
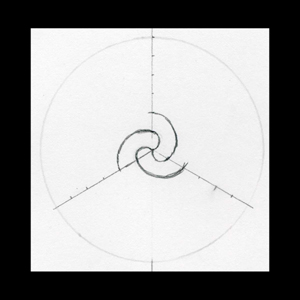
So one more time, draw in a curve from the 2nd tic mark on the A line to the *3rd* tic mark on the C line etc.
Now obviously, we could repeat these steps until we reach the edge of the circle. But just for fun, let’s mix it up a wee bit. So from the 3rd tic mark on the A line, draw in a curve to the *5th* (skipping the 4th tic mark) on the C line. And repeat.
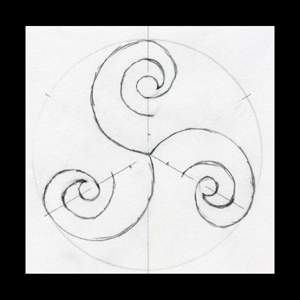
Because we changed the width of the bands, let’s put trumpet/ovals in. On each line draw an oval shape.
With me so far? On your A line, draw in a curve from the inside point of the oval (3rd tic mark) to where the C line meets the original circle. And repeat.
Let’s add a little bit of interest to the center before we move on. Because I usually just eyeball this and can’t figure out *how* to describe it, we’ll draw in one more eeensy little tic mark. Grab your ruler & a magnifying glass & make a tic mark on your lines 1/16” from the center. Now draw in a *slightly* curved line from the original half-circle on your C line, passing through that new tic mark, to the original half-circle on the A line. Here’s mine:

And a detail if you need it:
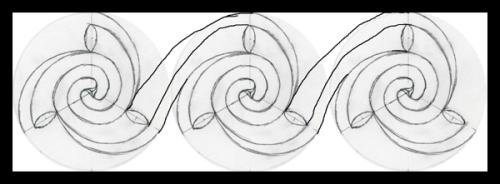
And that’s how you do a club end. Before we finish this off completely, let’s talk about stacking & repeating this. Through the miracles of photoshop, here’s one possibility (repeated & joined):
And another (rotated, repeated, & joined):
And another (rotated, flipped, repeated, & joined):

Just like with the knotwork, the key to making spirals that look *hugely* intricate & difficult is developing a basic unit, in this case our fairly simple triskele, and rotating, mirroring, & repeating in an unlimited number of ways. The first two use really sloppy (sorry) S curves to join them. In the third example, the triskele is rotated, mirrored, & joined with equally sloppy C curves. And yes, there’s lots of blank space that just screams to have something more done to it. We’ll develop that sort of thing in a bit. But for now, let’s go ahead and finish off this one.
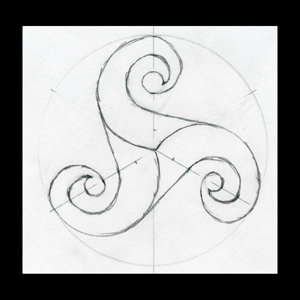
On your A line, draw in a curve from the outside point of the oval (5th tic mark) to where the C line meets the original circle. Repeat around & darken your original circle if it’s getting faint looking. And erase your A, B, & C lines, which I forgot to do before scanning.
So that’s it. Just to give you something else to think about, watch what happens when I thicken & darken the lines.
Getting some ideas? Hope so!
Ok, up next, another fairly simple triskele that curves outward. I should have that posted later this evening.
[FONT="Palatino Linotype"]Rosemary (aka Tess) - [/color]
[FONT="Book Antiqua"]How does she do that??? Find out here:[/color] Celtic Art 101
Do not meddle in the affairs of Dragons, for you are crunchy and good with ketchup.[/left]January 17, 2007 at 7:32 am #1079226Ok, this time, we’ll look at doing a triskele that spirals from the center toward the outer edge.
So let’s stick with the same size circle as the previous example. So 3” in diameter, divided into 3. On your lines, make tic marks every 1/4 inch. Once again, we’ll call them A (midline), B (120 degrees), & C (240 degrees).
On the *left* side of line A, draw in a half circle from the outside edge to your midline. Repeat on lines B & C. You should have a super simple triskele that is rotating counter clockwise.
On the *right* side of line A, draw in a half circle from the outside edge of the circle to the 3rd tic mark. Repeat on B & C.
Still on the right side of the line A, draw in a half-circle from the 1st tic mark to the 3rd. And repeat (for this triskele design, just assume I mean to repeat each step for each line).
Now draw in a *full* circle using the 2nd & 3rd tic marks.
Notice how there’s a spot where the curve of the inner half-circle departs from the small circles we just drew? Erase the part that they share like this:

So now you should have this:
And that, ladies & gentlemen, is how to do a comma end. Notice that in order to create a comma, you also create a point in your negative space. That can be fun to play with. But we’ll do that later. Right. Focusing. Not getting too hard too fast. On to the next step.
Back to the left side of the line. Draw in a half-circle from the 1st tic mark to the 4th.
Extend that curve past your A line so it meets with the peak of the big curve on line B.
So at this point, you could very easily erase your guidelines & the curves that cross into the interior area & call it good.

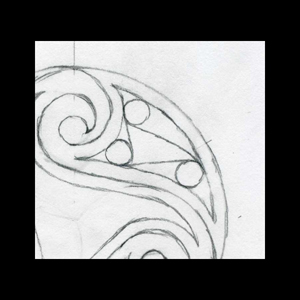
But that would be … simple. And I seem completely incapable of leaving it like that. So let’s ratchet this up a bit. In the spaces outside of the triskele, add in triangle-ish shapes that follow the curves. I tend to do them about 1/8” away, but it can be as fat or as skinny as you want. And let’s do the same thing *inside* of the triskele. Here’s mine:

Now what? Well… we could easily leave it like that. Adding texture or color. Or we could go a step or two further… Draw in small circles at the points of the outer trianglish shapes (here’s where that circle template comes in handy) Don’t worry about making them perfect.
Now connect the circles with S curves. If you draw them with the *left* side of one circle connecting the *right* side of the next one, it’ll continue the clockwise rotation. And it looks pretty darn cool just like that. But I simply *cannot* leave well enough alone!
So eyeball where the center of your little circles are, draw in a dot. Add a curve connecting the dot to the *opposite* side of the circle from where your S curves come in.
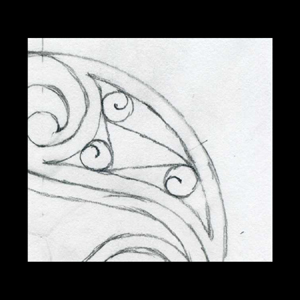
now erase the parts of the circles you don’t need.
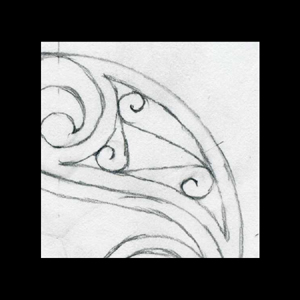
And here I’ve repeated the above steps in the center.
Can we go further with it? Of course! But I’ll let *you* play with it. This triskele is straight out of the La Tene period. And it can be repeated & stacked & joined with others like the previous example. I’d love to see what y’all come up with!
[FONT="Palatino Linotype"]Rosemary (aka Tess) - [/color]
[FONT="Book Antiqua"]How does she do that??? Find out here:[/color] Celtic Art 101
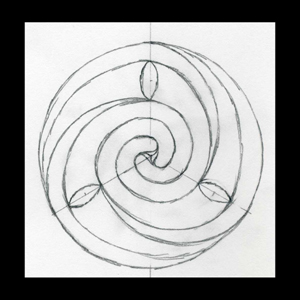
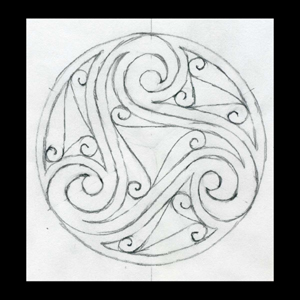
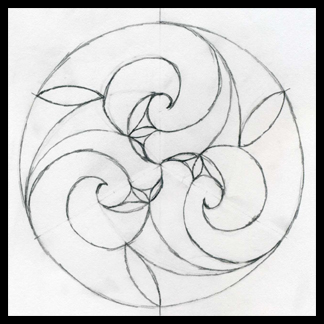
Do not meddle in the affairs of Dragons, for you are crunchy and good with ketchup.[/left]January 17, 2007 at 9:35 am #1079227Sick of triskeles yet? Let’s do one more that is *almost* to High Kells…
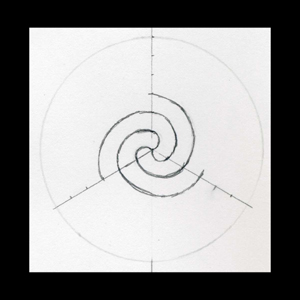
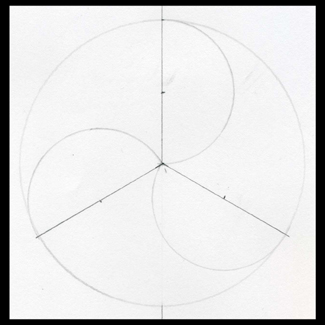
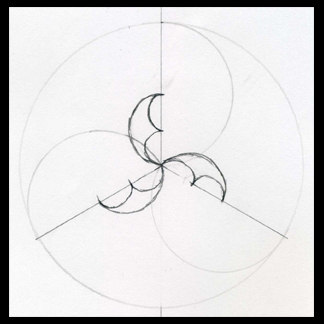
So, Just like before, establish your midline & lets do a 4” circle. Divide into 3. So that should look pretty familiar by now. The next step is figuring out what you want to do with it. Something to keep in mind, the way I do spirals I allow them to evolve. I hardly ever start with a good plan of what needs to happen. It’s also a good idea to do each step on all of the lines as you go. It’ll lessen confusion about what needs to go where…
That being said, take your ruler and on the A, B, & C lines you’ve drawn, find their midpoint. Should be at 1” in this example. Compasses back out, and starting with your A line, draw in a half circle on the *right* side of the line. Repeat on the B & C lines. (Save me the typing & assume that for each step, ok?)
Ok, got your ruler handy? Measuring from the midpoint, make a tic mark at 1/2 inch on each of your lines. Now using it as a guide, draw in a half-circle on the *left* side of your line. It’ll overlap the big half-circles a bit.
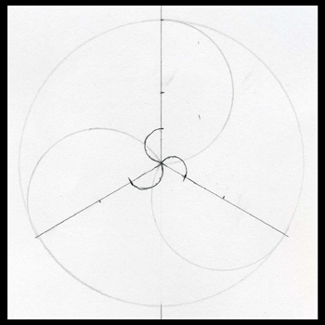
Now draw in another half circle, also on the *left* side of the line, from the midpoint to the 1” tic mark.
And once again on the *left* side, draw in a half-circle from the 1/2” mark to the 1” mark. You should have a bat-wing looking thing at this stage.
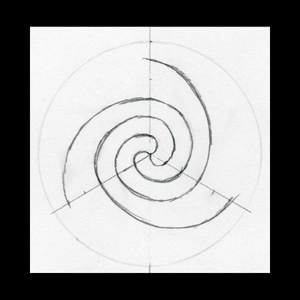
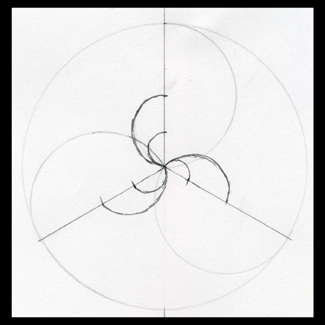
Now, back to the *right* side of the line. Draw in a half circle from the edge of the circle to the 1/2″ mark (middle of the batwing). You can use the compass (or a template) if you wanna, but eyeballing it is just fine.
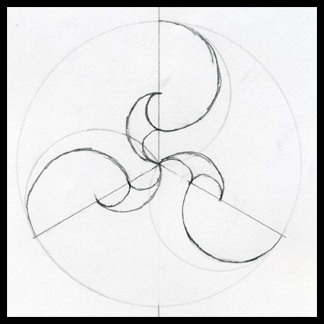
Ok. On the *right* side of the A line again, draw in a curve from the edge of your circle to the 1” mark on the B line (end of the batwing).
Still on the *right* side of the line, extend the line you just drew & curve it back toward the A line. Aim for half-way between the two tic marks, but don’t take the curve all the way to the A line. Here’s how mine looks:
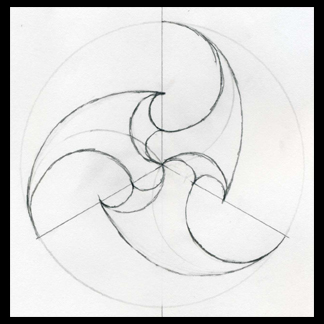
Remember the original curves we did in step one? Firm those up, but just to where they meet the first inside hump of the batwing on the next line. Erase the part that you don’t need. See how you’ve got a small, ovalish shape? Here’s mine:
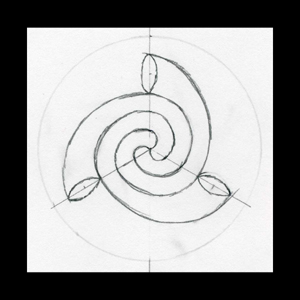
Now in that same little section of the batwing, draw in two more ovals. The books *do* agree on calling the motif we just did a lotus. I’ve also darkened my original circle. It was starting to get lost in the shuffle.
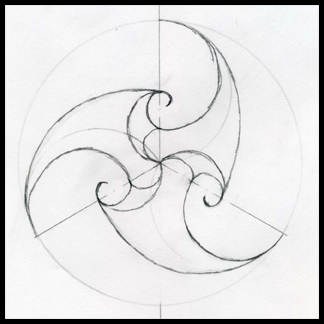
Ok, so now the original lobes of the triskele are starting to look a little blank & uninteresting… Lets fix that. On your lines, mark halfway between the outside edge of the circle & where the lobe curls, should be about 1/2” from the edge of the circle. Now draw in a curve from the endpoint of the curl to your tic mark.

Continue that curve around to where the ovals of the lotus meet. This will create a new lobe. Erase the lines you don’t need inside of it like this:
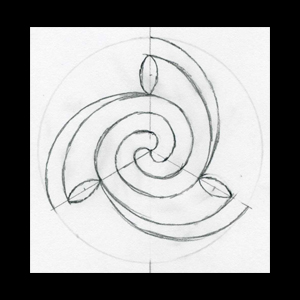
It still seems a little awkward… So one last thing should take care of that. Let’s add in one more oval/trumpet end to the very outside lobes. Take your ruler & lay it along your original lines. Make a tic mark on the *opposite* side of the circle from your original tic marks. Like this:
Using the tic marks & where the lobe has developed a point, draw in an oval. Also, erase your guidelines & call it good!
So now what? At this point, you can leave it as is. Or you can fatten all of those lines. Or a combination of the two. On this one, I would definitely fatten the line that is acting as a stem for the lotus. And for our original 3 lobes. And the little triangle shape that continues past the large trumpet. And erase where the lotus petals meet in the absolute center (1st image). And here’s some ideas of how to treat it (apologies for my less-than-stellar photoshopping).
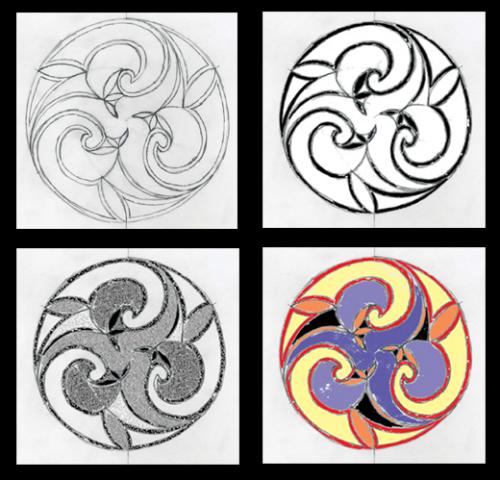
Hmmm… looking at the black & white version, if I were going to go that route, I’d probably go ahead & thicken up the lines that would finish defining the large trumpet & smaller lobe. So lets see what you come up with!
To take this the rest of the way to High Kells, add knotwork in any blank space you can find. And then use it as a base unit in a much *larger* triskele (hint: if you want to try it, your overall circle will be *at least* 8″ in diameter 8 1/2 might be better still… & it’ll be easier to join them with S curves if you orient it so the A line of this one is pointed to the center of the larger circle. I may try it a little later & post mine… )
Post or Pm if you have *any* questions!
Next, we’ll tackle a La Tene period border. I hope to have it up in the next few days.
Tess
[FONT="Palatino Linotype"]Rosemary (aka Tess) - [/color]
[FONT="Book Antiqua"]How does she do that??? Find out here:[/color] Celtic Art 101
Do not meddle in the affairs of Dragons, for you are crunchy and good with ketchup.[/left]January 18, 2007 at 12:30 pm #1079247Tess, Another awesome tutorial. You may think you started off slow, but you picked up steam as you progressed through the lesson. More to try!
– ChrisJanuary 18, 2007 at 12:55 pm #1079250Great tutorial! I’m going to start trying these right away. Thanks, Tess.
[FONT=Verdana]Here's to new beginnings! :music:[/COLOR][/B][/I][/COLOR][FONT=Verdana]
C&C and any other form of help always welcome!
[/COLOR] [/COLOR]January 19, 2007 at 6:53 am #1079228You may think you started off slow, but you picked up steam as you progressed through the lesson.
Thanks, Chris. Truth be told? that last one was what I came up with 1st for an “easy-get-your-feet-wet” demo. :rolleyes:
Alecto, it’s great to have you along! Looking forward to seeing what you come up with!
BTW… if anyone is trying to work that last triskele as part of an even larger triskele, the new circle *does* need to be *at least* 8 1/2″ in diameter. Got distracted playing with it… Should be posting what I did later today. The La Tene border? um… :o sometime after that?
Tess
[FONT="Palatino Linotype"]Rosemary (aka Tess) - [/color]
[FONT="Book Antiqua"]How does she do that??? Find out here:[/color] Celtic Art 101
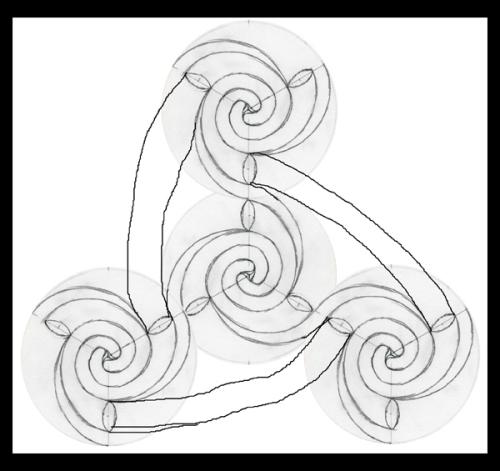
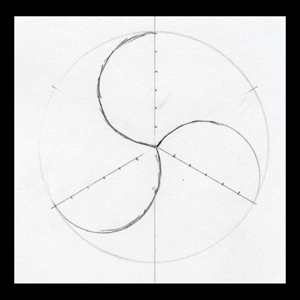
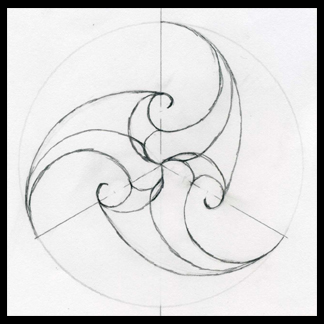
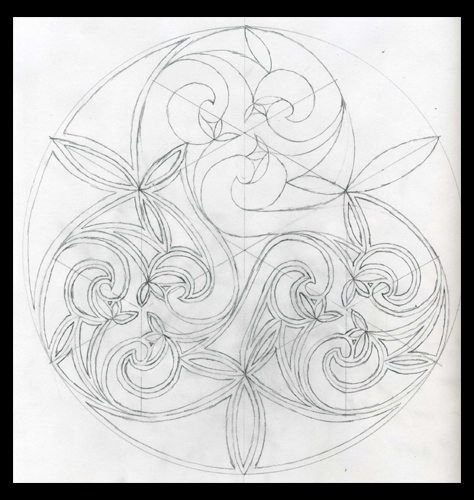
Do not meddle in the affairs of Dragons, for you are crunchy and good with ketchup.[/left]January 19, 2007 at 10:19 am #1079229So if anyone is curious, here’s how I’ve taken that last triskele & created a larger one:
The overall circle is now 8 1/2” in diameter. 8” would have created an overlap, and I didn’t feel like messing with the original design enough to make that work well. And because it will be *much* more complex than the original design, I went ahead and divided the circles into 6 segments, instead of only 3 (on the protractor, tic marks every 60 degrees).

And like I suggested before, I rotated the design so that one of the original guidelines (doesn’t matter if it’s A, B, or C ‘cause they’re all the same) is oriented towards the center. And I did trace this. I know in some areas of art tracing & projecting is frowned on & considered “cheating.” In my opinion, all bets are off when it comes to the Celtic stuff. I feel darn lucky to get it right the first time, much less repeat it accurately enough for it to look decent a bunch of times! End editorial. I didn’t include where I had thickened lines at this stage ‘cause what worked well when it was a single design might not look right once there are three of them & I’m trying to join them.
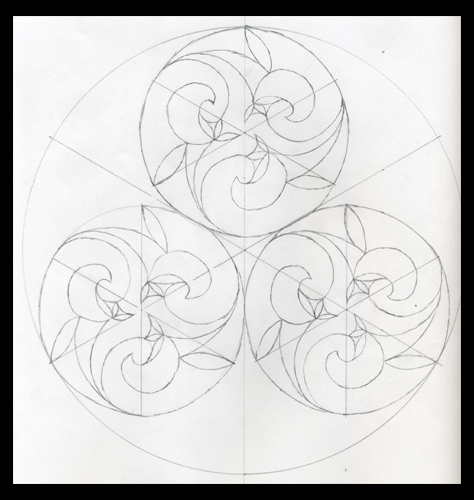
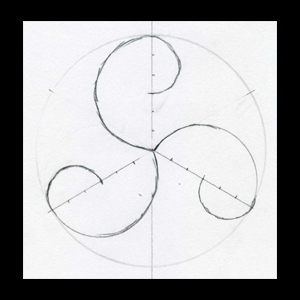
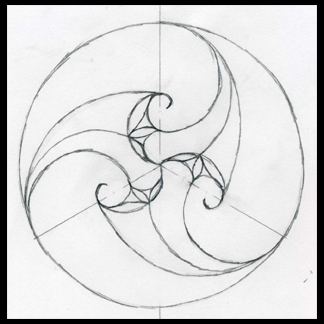
Here you can see where I joined them. Instead of doing just S curves, I decided to use the larger ovals as a good place to bring them together. I also enlarged them & expanded the arcs of those areas a bit, just to make it flow better.
So now comes the pacing & muttering stage while I try to figure out what would work where. Once I’ve got it I’ll post!
Tess
[FONT="Palatino Linotype"]Rosemary (aka Tess) - [/color]
[FONT="Book Antiqua"]How does she do that??? Find out here:[/color] Celtic Art 101
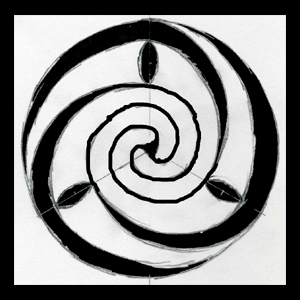
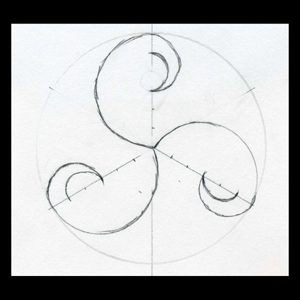
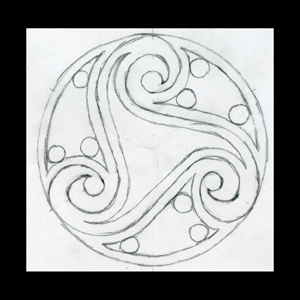
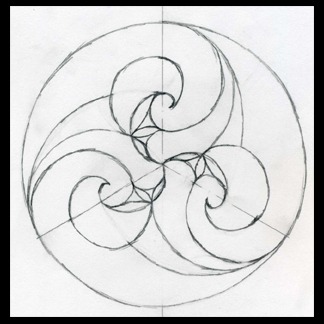
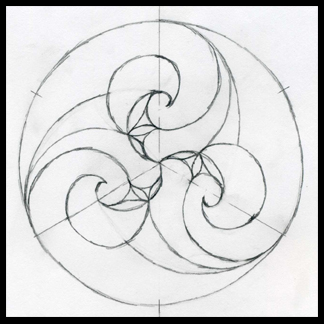
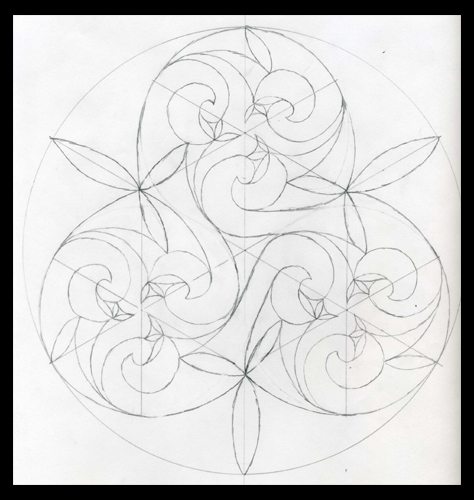
Do not meddle in the affairs of Dragons, for you are crunchy and good with ketchup.[/left]January 19, 2007 at 3:11 pm #1079230It’s definitely coming together now… You can see in the lower two circles where I’ve fattened some lines & created shapes within the the design. Didn’t do the top one yet so you would have a frame of reference for what I changed.
And of *course* ya gotta put knots in… Here you can see what I’ll use as my repeat unit. Anyone care to count how many triangle knots I used?
I’m liking this enough, I think I’ll transfer (trace) what I’ve done so far and develop a larger piece with it. I’ll do it as a WIP, kinda as a quick intro to doing a carpet page.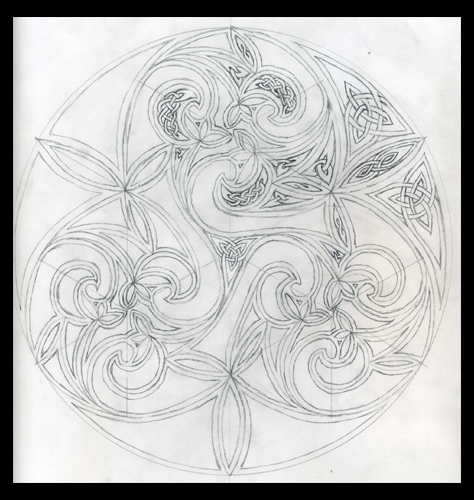
I promise, I’ll devote my *full* attention to that La Tene border soon. Really. Honest. I promise.
So let’s see how y’all are doing with these! Tess
[FONT="Palatino Linotype"]Rosemary (aka Tess) - [/color]
[FONT="Book Antiqua"]How does she do that??? Find out here:[/color] Celtic Art 101
Do not meddle in the affairs of Dragons, for you are crunchy and good with ketchup.[/left]January 25, 2007 at 6:56 pm #1079218I gotta stop looking at this stuff, I dont have the kind of time this is inspiring. That last one is just absolutely top shelf. bling.
Bob
The only thing that surprises me anymore, is that I can still be surprised:D
January 26, 2007 at 9:03 am #1079248Fantastic job Tess. I love the added knots. – Chris
-
AuthorPosts
- You must be logged in to reply to this topic.
Register For This Site
A password will be e-mailed to you.
Search